


Author: Gasper Habjanic

Hand Drawing Tutorial: Analytical Drawing II
Once again, this week’s Linescapes covers analytical drawing. As I emphasized many times before, drawing can be a great tool for analysis. I use it most frequently to record my thoughts when looking at a landscape. It also helps me analyze its shapes and patterns.
When analyzing a landscape, all kinds of background information is useful. I try to inquire about the processes that shaped the landscape, its geological structure, plant sociology and even history. The more we know about an environment, the more we are able to see and perceive.
RELATED STORY: Hand Drawing Tutorial – Analytical Section Drawing
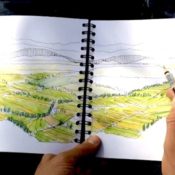
First, I draw the main features of the landscape. I outline the most visible lines, shapes and directions. Even if we don’t see an element in the landscape, we know its there. For example, the river in the distance, which while we can’t see it, we can still draw it. This is because an architectural drawing does not try to depict an actual image seen, but rather the one perceived.
After that, I move on to other textures in the drawing. An analytical drawing sometimes uses abstract forms to emphasize certain information. In the video below, this is visible in the abstract bottom edge of the drawing that emphasizes the geometry of the fields. I use color to emphasize the filed structure and different field use. Some sections are wheat, some corn and many of them are pastures. I do not color the whole image but use the color selectively – only on the landscape feature I’m interested in. This emphasizes the fields and is also a tool for analyzing.
Another layer of information that you can add to your drawing are the names of hills, rivers and important places. I write them vertically which gives those points more of a landmark feeling. In this way writing is also clearly distinguishable from the rest of the drawing.
Once again, I encourage you to try to look at drawing as a tool for analysis and try this technique out for yourselves!
You can also follow Linescapes on Youtube, Twitter, and Facebook!
Hand Drawing Tutorial: How to Draw Mountains
In this week’s tutorial we’ll look at how to draw mountains. Their interesting rock formations make mountains one of my favorite landscape types to draw. I also find their shapes and patterns a great source of inspiration for design.
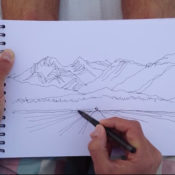
I usually start the process by drawing the shapes of the peaks. At the same time I also start adding texture to the drawing. Mountains comprise many lines and shapes in form of cracks and rock layers. Try to draw as many of those as you can to better describe the shape of the mountain massif. In general, the lines run more vertical if the surface is steeper and more horizontal if it’s more flat.
 Since we want to analyze and understand the shape of the mountain landscape, we can try adding shade on the mountains. There are always dark areas on a mountain and drawing them emphasizes the form. It also makes the drawing look more three dimensional.
At a certain altitude the bare rock stops and the forests begin. There I stop adding texture and draw the outline of the hills in front of the mountains. To create depth in the drawing I add value – I color the closer hills darker and the hills further away lighter.
I hope you share some of my enthusiasm for drawing mountains and will try out the techniques I have presented here!
You can also follow Linescapes on Youtube, Twitter, and Facebook!

Hand Drawing Tutorial: Analytical Drawing – Urban Scenes
As I always like to say: drawing is a tool for analysis, observing and thinking. That’s why a drawing can be much more than merely a recording of a view. It represents our thoughts and ideas at the certain time associated with a certain object or place.
Field sketching and drawing is great for landscape architects, since it helps us remember a certain landscape or it’s part. But another layer of information can be added to the drawing. In the video bellow, I draw a view of a medieval urban scene. One can quickly understand the morphology of the place – a hill with a castle and a town that has developed around it. But in order to remember non visual information as well, I add names and functions of certain more important buildings in the view. There is also an element that is important for this urban landscape, but isn’t visible – the river. To highlight it, I draw an arrow that shows it’s location in the urban fabric.
RELATED STORY: Hand Drawing Tutorial: Analytical Section Drawing
I encourage you to make use of your sketches and add as much information as you can! This can be everything from the name of the place, description of the atmosphere or information about plants and soil, to your personal thoughts at the moment of drawing.
You can also follow Linescapes on Youtube, Twitter, and Facebook!
Hand Drawing Tutorial: One Point Perspective
Today, we’re going to look at drawing in perspective. Mastering basic perspective is crucial for drawing outdoor environments, where we almost always experience depth of space.
Perspective drawings are usually used for presentational drawings, but they’re useful for fast sketches as well. And even if we don’t construct an exact perspective when we are sketching outside, it’s important to have a feeling for it, since that helps us draw and sketch faster.
Let’s look at some tips for drawing a perspective. We start with a straight horizontal line called »the horizon«. The most important thing to remember about this line is that it is the eye height of all the people in the drawing! To understand this, draw some simple figures in the drawing. The ones up close have the eyes on the level of the horizon line. Now if we want to draw a figure that’s further away, we start drawing another one with the eyes on the horizon line, but make it smaller. It appears to be further away. We can draw a lot of these for exercise and make a group of people walking towards some unknown location in the distance.
What I usually do, is use a person as the basic measurement in the drawing. An average person about 1,6 or 1,7 meters high. That means, that if this person is walking on a path 2 meters wide, we can project his height on the ground beneath him and get an approximation of the path width. Once we have a path width, we can draw a path that ends in the vanishing point.
This is also useful for drawing the approximate tree sizes. Remember that the tree trunk is almost always higher than a person. So the canopy starts above the heads of the people in the drawing. If a tree is further away, you can use a person in the distance for the measurement.
Now let’s look at 3 steps of drawing a perspective with one vanishing point:
1. Draw a horizon line, which represents the eye-height.
2. Pick a point on the horizon as your vanishing point. I suggest putting in off center, since it’s too symmetrical and boring if the vanishing point is in the center. All the lines that are parallel to each other in plan are going to end in that vanishing point.
3. Draw a figure, so you get a feeling of scale. It’s eyes are on the horizon line.You can also add other vertical elements such as trees. Remember, use the figure to determine the height of trees. It’s trunk has to be higher than the horizon line. You can use the same method to determine the height of buildings. All of the lines of the facades, which are parallel to the path, will also vanish in the vanishing point.
I hope this tutorial will help you get the right feeling of perspective in your fast sketches.
You can also follow Linescapes on Youtube, Twitter, and Facebook!

Hand Drawing Tutorial: Drawing Architecture
Drawing landscape and drawing architecture can be two quite different things. This week, we’ll look at drawing architecture and why it’s also important for landscape architects.
Despite being landscape architects, we usually find it much easier to draw a building or an urban environment rather than a landscape. The reason for that is because of anthropogenic elements, such as architecture, which have very distinct and clear shapes and are thus easier to draw. A landscape, on the other hand, especially if it’s a natural landscape, is much harder to draw. There are fewer obvious patterns and clear shapes that our eye can recognize and translate into drawing. Still, there are a few things one can remember about drawing architecture that can benefit you as a landscape architect.
RELATED STORY: Land8 Member Spotlight: Interview with Gašper Habjanič
I draw architecture in a similar way to how I draw landscape – from an analytical point of view. When drawing architecture it’s important to remember that most of the time it’s not the building itself that is of interest to us, but the relationship between the building and its surroundings. Each building creates a certain kind of space around it, which can then be connected to its surroundings or stand out from it. Whats is of interest to a landscape architect is how the building relates to the landscape around it.

The image above is a sketch looking out from Palladio’s Villa Rotonda. These views of the traditional and cultural Campagna landscape were the ones that dictated the villa’s position and design. The villa has a special connection to its surrounding, and that interested me the most as a landscape architect.
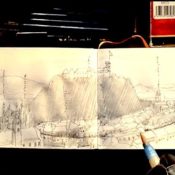
In the video below is the Karlskirche church in Vienna, Austria. I was interested in the view of the church from the park, as well as its plan and shape.
Linescapes is a project focused on exploring drawing techniques for recording and analyzing landscapes. It also tries to promote hand-drawing in landscape architecture.
You can also follow Linescapes on Youtube, Twitter, and Facebook!

Hand Drawing Tutorial: How to Draw Faster
This week we’ll look at some techniques that can help you draw faster. But first, let’s ask ourselves why do we want to draw faster?
In ideal circumstances, we can take as much time as we need to complete a really detailed drawing. On many occasions, however, we don’t have enough time to draw and it’s important to be able to squeeze as much information onto a drawing as possible in the time span we have available. That’s when you need to draw fast.
Before we start, you need to remember an important fact: there is no such thing as a bad sketch, no matter how fast it’s drawn or how accurate it is. A sketch is always a graphic recording of our thoughts at a certain time in certain circumstances. Even if it’s just a fast scribble.
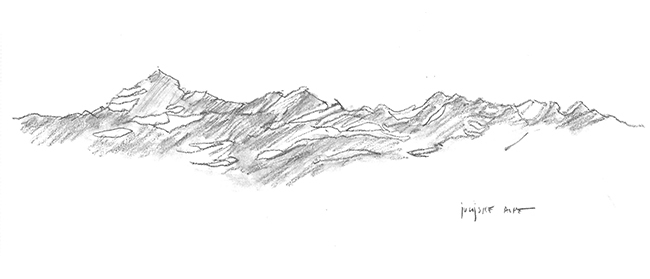
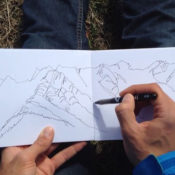
When we don’t have much time for a drawing, I suggest starting with the part of the image we’re most interested in in case we run out of time to complete the whole drawing. In the sketch in the video it’s a mountain massif, a part of the Alps between Slovenia and Austria.
There are two ways to draw faster. The first one is obvious – one simply moves the hand faster. It’s not hard – we constantly do it naturally when we want to draw something simple, like a scribble. I’d like you to try doing the same when sketching and you’ll be surprised how easy it is. By consciously practicing this, you’ll get faster with every sketch.
The second trick I use is not removing the pencil from the paper surface. Lifting the pencil takes up a surprising amount of time. We usually do it when we turn our eyes from our drawing to observe the image drawn. But when we want to draw faster, we can simply continue to move our hand during the moments when we’re not looking at our sketchbook and let the pencil draw a continuous line throughout the drawing. The result is also a special kind of flowing drawing. This works great for drawing landscapes, but not so much for drawing urban scenes, which tend to have straight lines and sharp edges.
When you finish the motive you’re interest in, like the mountains in the video, you can move on to other less important parts of the drawing. I add the forest up front, the small chapel and of course, the structure of the fields.
And also a final tip. Our drawing speed also depends on the the pen and paper we use. Some pens or pencils just don’t allow fast drawing, while others have a smooth flow and are more adequate for fast sketches. Also, it will be harder to draw fast on watercolor paper then on smooth paper. So consider this before going out drawing.
Fast sketches often tell us even more than normal drawings. It’s because when we do not have enough time, we stick to what’s important for us in the image, and thus produce a very informative drawing that contains information important to us. Some of my best sketches were drawn really fast, while travelling on the train, bus or in the car–in the passenger seat, not the driver’s seat obviously.
I encourage you to try these techniques out, and remember: there is no such thing as a bad sketch!
Related article: How to Choose Your Pen and Sketchbook
Linescapes is a project focused on exploring drawing techniques for recording and analyzing landscapes. It also tries to promote hand-drawing in landscape architecture.
You can also follow Linescapes on Youtube, Twitter, and Facebook!
Hand Drawing Tutorial: Analytical Section Drawing
Drawing can be a powerful tool for analyzing an object. We draw what we perceive and not what is actually there. Therefore our drawing always contains our thoughts, knowledge and ideas.
Today I will talk about a useful way of drawing for recording and analyzing landscapes. It’s called analytical section drawing. It is similar to geographical illustration – it gives us information about a part of the Earth’s surface.
We start off with a bird’s eye view of the landscape. It’s important to choose an area that tells us a lot about the structure of the landscape. In the drawing in the video it’s a valley with a river running through it in the middle. On one side, we have terraced landscape with crop fields and a settlement, on the other there are vineyards on the slope and forest on top of the hill.
Once we have the outline, we add an important element to the drawing – the face of the section. It is in fact a tool for abstraction – when we abstract something, we obtain a new perspective of seeing it and may learn something of it that we wouldn’t by merely looking at it or even drawing it in a normal way. This kind of drawing is not necessarily an totally accurate image of the landscape we analyze – we don’t have to draw all the trees or all the houses. What we do get is a general idea of how the landscape is structured. And that is important.
Landscape is a complex system and usually a broad surface of the terrain. It is hard to include all it’s characteristics in a normal drawing or sketch. But this method of drawing allows us to add a lot of information. I add information like orientation of the valley and individual landscape elements.Through drawing this landscape I noticed that the northern slopes are steeper because of southern exposure – it causes erosion. Because they are steeper vineyards appear on them. Crop fields appear on the other, more flat side of the valley. We could also add information from other fields of science like geology, plant sociology or geomorphology.
I hope you’ll find this method useful and I encourage you to try it out sometimes!
Linescapes is a project focused on exploring drawing techniques for recording and analyzing landscapes. It also tries to promote hand-drawing in landscape architecture.
Hand Drawing Tutorial: Drawing With Watercolors
Color in landscape architectural drawing is a tool for emphasizing important elements of the image, structuring or improving understanding. An architectural drawing does not try to catch the actual natural colors or the atmosphere the way a painting does, but uses color rather in an abstract way.
There are different techniques to paint with watercolors that range from wet to dry papers, brushes and different techniques of mixing colors. In this video I’m showing a fast way to color drawings. Often we do not have much time for field sketches and in these cases we paint differently with watercolors than we would in a studio. We mostly paint using wet paint on dry paper.
I start by drawing a line basis of the image with some textures, that i’m about to color. The farm is the central point of the composition, but will leave it blank, as the landscape is the element of interest.
First, I paint the fields up front with one color. I do not let different colors to mix, but rather paint separate areas, because i’m interested in the landscape structure they create. In order to do that, you’ll need a little patience and never paint right next to an area of paint that is still wet, as it will cause the paint to bleed into other parts of the drawing. Always allow paint to dry before painting next to it.
The important thing to understand while using color in an analytic way is that different colors of the fields do not necessarily represent different colors in nature, but show the different use of the land – pastures up front and crop fields in the back. I use the color tone for hedges which are the most characteristic element of this landscape and need to stand out.
Overall, avoid painting to the edges of the paper. Let the color fade on the edges, as that gives the impression of continuity and does’t frame the image.
Linescapes is a project focused on exploring drawing techniques for recording and analyzing landscapes. It also tries to promote hand-drawing in landscape architecture.
You can also follow Linescapes on Youtube, Twitter, and Facebook!
Hand Drawing Tutorial: How to Draw Tree Groups
Monday is here and it’s time for another Hand Drawing Tutorial! This time, we’ll look at drawing tree groups.
When drawing groups of trees, it’s important to understand the level of detail you want to apply to a such a drawing. That depends on the distance of the trees from the viewer. We perceive the trees up close as single trees, even if they’re in a group. More remote trees however, we percieve as coherent volumes. The more distant the trees, the greater this effect. Trees far away are percieved only as flat layers.
This effect is especially visible in case of drawing wooded hills. Although the hill is covered in trees, we don’t draw single trees when drawing hills, since we percieve the trees as a single body in shape of a hill. When drawing hills, I usually hatch the hill with a vertical hatch, which makes it more flat and abstract. Although it’s covered in different trees I draw it as a single shape. This makes the element of interest – for example the church on top of the hill, stand out.
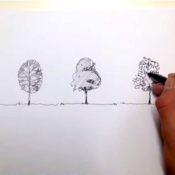
Let’s look at the steps of drawing a tree group. First draw the outline of the whole group. We always perceive tree groups as single volumes so it’s important to define their shape. Second, add detail depending on how far away the group is. If the trees are close, I usually add some branches and hints of single tree canopies. In the end I use a oblique hatch to emphasize the volume of the tree group.
The second way to draw a tree group is to draw the habitus with the branches of the trees. If you observe a tree group in winter without leaves, you can notice that the branches somehow merge as if they would all belong to a single tree. First draw the tree trunks and then smaller and smaller branches, all the way up to the smallest twigs on the edge of the habitus. This kind of drawing reveals a tree group in a more analytical way and can also tell us the species of the trees in the group.
Related article: Hand Drawing Tutorial: How to Draw a Tree
Linescapes is a project focused on exploring drawing techniques for recording and analyzing landscapes. It also tries to promote hand-drawing in landscape architecture.
You can also follow Linescapes on Youtube, Twitter, and Facebook!


Hand Drawing Tutorial: How to Create Depth in a Drawing
Drawing is a great tool for recording and analyzing spaces. Sometimes such a drawing also needs to capture the depth of space. I’m going to show you some tricks that will help you achieve this in a drawing.
As usual, I begin the drawing with an outline of all the elements in the image. In a many layered drawing like this, it is important to distinguish between front and back layers for the sake of understanding the image. By graphically differentiating the layers we create the illusion of depth.
One way of achieving this is to add more textures and detail up front and reduce them in more distant layers. I draw roof tiles on the front buildings, windows, tree branches and other detail such as texture of the raised within the gardens. In the back layers, I use less and less detail, and only leave the outlines of the further most layers. However, I do add detail to the church, as it is a landmark in this landscape and thus important.
The illusion of depth can be achieved also by adding color. We can do this by painting the front layers with intensive colors and the back layers with mild colors. I leave the most distant layers blank. When drawing fast with watercolors you should also remember that accuracy isn’t important, but rather the overall feeling of depth the color provides.
(Related Article: Hand Drawing Tutorial: How to Choose Your Pen and Sketchbook)
Linescapes is a project focused on exploring drawing techniques for recording and analyzing landscapes. It also tries to promote hand-drawing in landscape architecture.
You can also follow Linescapes on Youtube, Twitter, and Facebook!

Hand Drawing Tutorial: The Importance of Drawing
Have you ever asked yourself why is it important to draw? We’ve all learned how to draw in school, but with the rise of digital media, we seldom need to use drawing as a tool later in the career. In this video I will talk about the importance of drawing for landscape architects and designers.
I distinguish between three types of architectural drawing: sketching of our environment, design drawing, and presentational drawing. Sketching is mostly observation of our environment; design drawing is a tool for design and recording of our thoughts; and presentational drawing is a tool of communication between an architect and the general public. I believe us landscape architects and designers have to use all three.
Now let’s look at why is it so important for us to draw: Firstly, drawing is thinking. It is a visual recording of our thoughts at a certain moment. This goes for sketching the environment as well as design sketches. A sketch is also one of the important tools of design. It is an indispensable tool for imagining 3D space on a 2D surface. It allows us to think about the space in an abstract way.
Secondly, it is through sketching that we collect a visual library of forms that we can later use consciously or subconsciously in our design. Our environment is rich with patterns and shapes and it is especially interesting to explore new and yet unknown landscapes and environments through sketching.
Thirdly, through drawing we remember and understand more. We can see and understand a lot of the landscape with one look, however, we tend to focus only on some elements of the percieved image and leave out the rest. Through sketching we take more time to observe the image seen and perceive also the layers that we would miss by only looking. Also, drawing is not merely creating an 2d image, but also understanding the image through the act of drawing. The motions we make with our hand are recorded in our kinestetic memory. We remember the gestures – and a gesture is the most basic tool for design. A single physical gesture can already describe a design concept.
Lastly, sketching and free-hand drawing are important basics for presentational drawing. We get the feeling for perspective, angle, important focal points and composition. We need all these skills later for presentation in the form of digital drawings, collages and computer renderings. It is also important to explore different drawing techniques. They not only give us a variety of different recording possibilities but, by choosing different techniques in drawing, we reveal something of how we choose to see the landscape or object. Therefore a choice of a drawing technique is also a result of our perception.
(Related Article: Land8 Member Spotlight: Interview with Gašper Habjanič | Linescapes)
I hope these reasons will encourage you to draw more and explore the different possiblities of drawing!
Linescapes is a project focused on exploring drawing techniques for recording and analyzing landscapes. It also tries to promote hand-drawing in landscape architecture.
You can also follow Linescapes on Youtube, Twitter, and Facebook!

Hand Drawing Tutorial: How to Draw a Tree
Drawing trees is an essential part of landscape architecture. The most important thing to understand is the level of detail we want to apply to a tree. The type of drawing we want to use for a tree depends on the scale. We abstract the trees that are more distant and apply more detail to the ones up frot or the ones we want to emphasize. This video explores the techniques for drawing trees. While there are infinite ways to draw a tree, I tried to narrow it down to three different techniques I use.
Linescapes is a project focused on exploring drawing techniques for recording and analyzing landscapes. It also tries to promote hand-drawing in landscape architecture. You can also follow Linescapes on Youtube, Twitter, and Facebook!
- 1
- 2