Article by Kurt Longland We explore some useful YouTube videos to give you a crash course in AutoCAD, a staple of Landscape Architects all over the world. AutoCAD is one of the fundamentals of our design industry, and will continue to be used as part of the industry standard. So it is only a matter of time before you will be introduced to the program. While on the surface it looks plain, simple, and just waiting for your paper-based project to convert into a digital design, the hidden complexity underneath makes AutoCAD hard to master. While practise, time, and exploring will allow you to understand the quirks of AutoCAD, time is of the essence. So to speed you along or to introduce you to the program, here are a collection of YouTube videos/series that we recommend as we take a Crash Course in AutoCAD.
It’s time to get to grips with AutoCAD. Image from our article 5 Easy Steps to Mess Up Your AutoCAD Drawing … and Make it Look Better
Crash Course in AutoCAD
Step One, the Basics
To begin the Crash Course is this miniseries by easycad4you; during the duration of these three clips they begin by explaining how AutoCAD is laid out. First, they show how you can move around the model spaces and interact with both the control panel above and the command prompt line below. WATCH >>> AutoCAD 2015 Tutorial 1: “Introduction to AutoCAD”.
Then with this introduction under your belt, the next video shows working with basics lines, and how to merge multiple lines into a single object. WATCH >>> AutoCAD 2015 tutorial 2: Basic Drawing
For the last video, easycad4you presents how to save your work, and how to set the autosave timer, an invaluable resource for any autoCAD project. It then explains and presents the drawing aids that are seen in the bottom bar. It also reveals how to draw in isometric projection. WATCH >>> AutoCAD 2015 tutorial 3: Protect your work and Drawing Aids
Another video that introduces the AutoCAD basics is this one by AutoCAD Tutorials. The way it has been presented is a more hands-on, as-you-go approach, but it also shows how to transfer your work to the layout pages in order to scale drawings, and print. WATCH >>> AutoCAD Tutorials for Beginners
Step Two; but What About This…
However, for those that are in the middle of a panic, know the basics, or just require a refresher course, these next videos are on quick tools and tips to assist with your AutoCAD dilemmas.
Layers!
As mentioned in Rob Koningen’s “10 Must-do’s to Become a Professional AutoCAD User”, Layers are one of the greatest benefits and curses for a beginner in AutoCAD. Not only can they be hard to manage, but understanding how to navigate them can be one of the biggest learning curves to the program. However, this video below features clear instructions on how and why layers are created, managed and used. WATCH >>> AutoCAD for beginners – Add and Edit LAYERS (change colour, linetype, lineweight…)
OSNAP
Osnap is a hand tool that allows the user to see the relationships within the linework, such as the middle point, line edge, node point or centre lines. With this tool, you can make sure your work remains as precise as possible. WATCH >>> AutoCAD 2D – 4. How to use OSNAP (drawing with precision)
Blocks
Designing CAD trees, benches or tables can become tedious affair and when a site requires mass representation, individually drawing each artifact would take too long and trying to copy and paste every time could become troublesome with complicated work. However, there is a method of using and creating Blocks. Blocks are small groupings of selected lines, and once saved will always create these lines when required. The advantage of Blocks is that once a block is created it can be saved and reused in other AutoCAD Project. See the video below on how to create blocks. WATCH >>> Beginners Autodesk AutoCAD 2014 Tutorial | Creating Blocks
Printing to Scale
When the work is complete or another computer requires the documents, instead of creating a snapshot of the project or presenting the raw files, there are the layout options in AutoCAD. Not only does this video show how to transfer work from the model space to layout space, but it also covers how to scale the drawing to the desired and correct scale. WATCH >>> AutoCAD – 13. Print from Layout (simple and complete tutorial!)
Extensions
While AutoCAD offers many options and much freedom in our creative work, there are applications and plug-ins that can greatly assist by saving time. So here is a clip on how to install these apps. WATCH >>> AutoCAD Tutorial Load a Lisp or Application
For an example on some of these applications please view the range of articles written by other members of Landscape Architects’ Network:
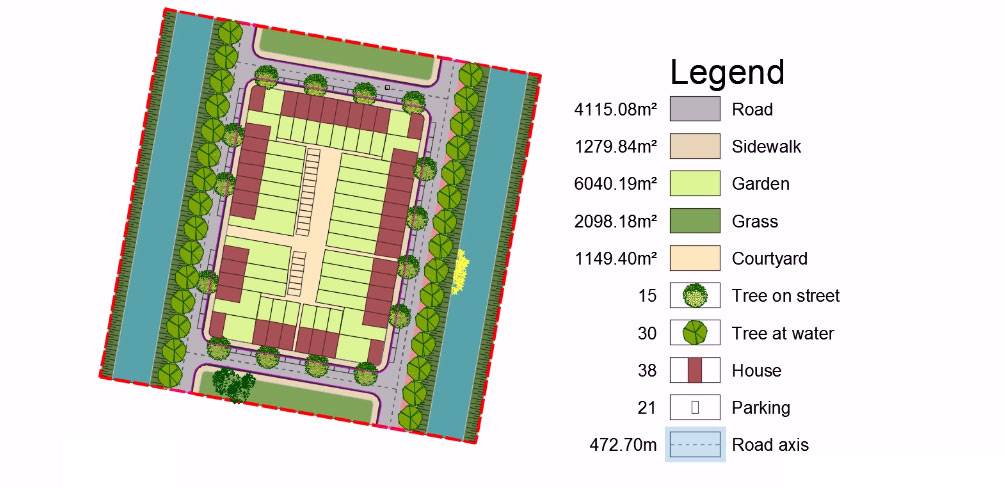
- The art of Creating a Legend AutoCAD Tutorial
- 5 Easy Steps to mess up your AutoCAD Drawing and make it look Better
- Turn Useless Objects into Gold; Give your AutoCAD Drawing a Makeover
- How to Place Large Quantities of Trees in a Master Plan Instantly with AutoCAD
- Add Detail Sections AutoCAD
Step Four, Good Luck!
This concludes the crash course in AutoCAD, hopefully these clips have helped you as much as they have been able to help us. But alas, some of the greatest tips and practises come from our own personal experiences. So we leave with this; What has been your greatest advice or go-to when working in AutoCAD? Recommended Reading:
- AutoCAD 2016 For Beginners by CreateSpace Independent Publishing Platform
- AutoCAD 2014 For Dummies by For Dummies
Article by Kurt Longland
Published in Blog