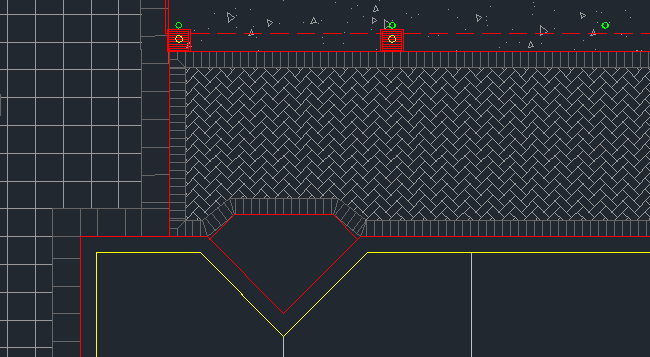
If boosting work efficiency is one of your New Year’s resolutions, you’ll love Land8’s new series. To kick off the new year, Land8 member Paul Stafford will be contributing his AutoCAD tips and tricks every week as part of Tech Beat Tuesdays. Keep reading for his easy to follow tutorial on creating paving header course!
A paving header course adds an extra level of detail to your hard finishes plans and graphically helps to complete the picture. If used together with a paving hatch pattern it gives a very good indication of your design intent. But the paving header course can be very time consuming to create if you do it all manually. The paver size I will represent is 230mm long x 115mm wide x 60mm thick – though of course for this purpose the thickness is irrelevant.
WATCH THE VIDEO BELOW TO SEE HOW TO DO IT
STEP BY STEP INSTRUCTIONS
ANY QUESTIONS?
Did you find that helpful? I will do another post that shows how to handle the paving corners. Let me know if you have any comments/questions/suggestions.
Paul Stafford
Published in Blog


Daniel Miller | RLA, LEED AP
Good tip; I use it all the time for pathway scoring, paver headers, street trees at equal spacing, etc. but, unlike the tips in the video, I personally (if its of any assistance to anyone else):
– don’t explode the PLINE. I’ll let the MEASURE command run its course on the entire, closed length of my entire PLINE and simply clean it up later.
– if you have trouble with the MEASURE command placing your blocks on the wrong side of your PLINE, try creating your block with the “Base Point” at the midpoint of your score line and then just offsetting your “measure line” by half the distance you’re looking for. For example, if you have a 5′-0″ (60″) sidewalk, simply offset your line 30″ to the midpoint of the walk and then use the block with the centered base point to run along that center line.
Paul Stafford
Hi Daniel
Thanks for reading and for your comments. It’s good to hear other people’s workflows.
Yes the MEASURE command is very useful. The other things I use it for are bollards and lights.
Exploding the polyline step is a personal choice. I find it gives me a little more control over where the full pavers are and leaves less me cleaning up at the corners.
If I’m doing a quick concept design I won’t explode the polyline. Same if the path is organic.
You’re right setting the block insertion point to the mid-point works very well also.
Regards
Paul
Jason T. Radice
While the measure command is a good one to know, there is a much simpler way to do this.Simply draw the line from where you know there will be a joint, offset a few times and then copy copy copy using the base of one of the joints as the copy point. Quick, easy, and no 20,000 blocks which can clog up the machine. Plus, it is much easier to slide the lines so that proper jointing is shown. That is by far the fastest way I’ve found to do soldier/sailor courses, and I’ve done plenty.
Thanks for the tip, though.
Ged Everson
Surprised you didn’t mirror rather than undo and redo.
Also could have used Array, follow path, selected the interior offset polyline, set the spacing to 115, then fix any corners…
Paul Stafford
Hi Jason
Thanks for reading. Yes I’ve used that method too. While it might be as quick for small areas of paving I find this method much quicker for large expanses. Plus this method works for curved paths. Also you can quckly update/amend the header as it’s a block.
While I agree that lots of complex blocks may cause a slowing effect these blocks are simple. I’ve used this with big teams on huge projects with no issue.
Regards
Paul
Paul Stafford
Hi Ged
Thanks for reading. I think it’s bad practise to mirror blocks. If you need to amend them later it can cause headaches.
Good point about array. Yes since AutoCAD 2012 the array along path function has been available. I will update my post on CADsmarter to include this as it is a much faster method. Many of my clients are on 2011 or earlier so can’t use this quicker method
Regards
Paul
Goustan BODIN
Glad to see this new series, great for someone who still has so much to learn as I do. Keep it up !
Paul Stafford
Hi Goustan
Thanks for your comment. Enjoy the series – hope you find it helpful
Regards
Paul