


Article by Nick Shannon In this article, we will explore how you can start making awesome 3d models in Rhino, a useful tool in conceptualizing and testing designs. The field of landscape architecture requires a broad range of tools to communicate the analysis and design of a site. One of the most effective tools we have is the visualization of the landscape, through perspective drawings, sections, models, or plans. Many ideas are thrown out on trace and through sketching, but computer programs take the initial idea to the next level. 3-D modeling software is becoming a key communication tool for landscape architects to collaborate on projects with interdisciplinary teams and clients. Rhino is one of the most user-friendly programs out there, and there are plenty of helpful tutorials to help you maximize your use of the program. The best way to learn is to create and practice your skills, so get out there and start playing around with Rhino. Download a free 90-day trial of Rhino 5 here: https://www.rhino3d.com/download You can learn just about anything through YouTube tutorials, but sometimes it’s hard to find the right ones. Here is a list of the best YouTube tutorials for Rhino so you can start your search. 10. Introduction to Rhino Rhino feels similar to AUTO CAD, and they share some of the same commands. However, if you have never used the program before, it is essential to get accustomed to the basic layout and commands of its interface. Make sure you start off with the right units; then you can begin to draw in three dimensions. The great thing about Rhino is that you can easily use four viewports while drawing: Top (plan), Perspective, Front (section), and Right (section). This gives you flexibility while drawing to make sure the right points are being selected. To move around in the viewports, all you have to do is right click. Watch the tutorial and follow along to start getting accustomed to the interface. The basic commands are covered in this video … start drawing! WATCH >>> Rhino 3D Beginners Tutorial and Tips
9. Curves and Surfaces Any site we work on is made up of a variety of structures, forms, and systems. The basic elements of a design can almost always be pulled apart into solids, curves, and lines, all of which you can create and edit in Rhino. You cannot have a solid object in Rhino; the closest thing is a water-tight poly surface. Curves can be made from a line through the commands in the command line. Polylines are a chain of lines, and the polyline command should be used to draw for greater flexibility. Rhino uses control points, which can be turned on or off and manipulated for easy edits after the fact. The curve command can be used to create a curve from control points of a polyline. You can also use a command to turn polylines into a curve. As in AUTO CAD, there are ortho and object snap parameters. These can be turned on and off at the bottom of your screen. Hold control to move in and out of the plane (be aware that some commands are only available if everything is on one surface, but there are ways to get around that). You can also make surfaces from curves, from extrude, solid (for a closed curve), planar surface (for curves within a single plane), trim, edge surface, or loft (this is helpful while designing walls). WATCH >>> Rhino tutorial 4 surfaces
8. Site Topography Model One of the first things to visualize on a site is the topography. If you are lucky enough to have contour data, you can certainly bring it into Rhino from AUTO CAD to create a surface of the existing conditions. At minute 17:00, the second part of the tutorial explains how to create a model from contours. For this to work, the contours in AUTO CAD have to be set at their correct elevations so you can create an accurate surface in Rhino. The great thing about importing into Rhino is that it keeps the layers. The patch command is used because the contours are so complex. Extracting the points is the first step, then the patch command can be utilized. This creates a surface over the points. The next step is to trim the surface to the bounds of the site. Projecting the property line onto the surface allows the trim command to work. The contour surface is a great tool to start visualizing your site. Although it is not 100 percent accurate, it is pretty close! WATCH >>> Digital Fundamentals Week 3 – Introduction to Rhino and Site Model
7. Topography from Google Earth If you do not have contour data available, or want to visualize a larger swath of the landscape, topographic data from Google Earth is readily available for your use. This tutorial starts in SketchUp, and the great thing about Rhino is that it allows you to import models from SketchUp. The surface can be manipulated further in Rhino and patched to create a solid NURBS surface. This means that the surface is available for use in Rhino and across other programs. NURBS stands for non-uniform rational B-spline, which just represents 3-D geometry. WATCH >>> Topography from Google Earth
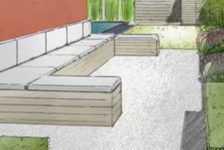
We often start to analyze a project from the large scale to understand the systems and processes that shape the site and to test interventions in the existing framework. This starting point can add context to your work to create a comprehensive design. 6. Extruding Along a Curve A lot of designs involve curvilinear forms. They add interest to the landscape and encourage a distinct flow of people or design elements. Extruding along a curve can become really helpful while creating benches to navigate complex geometry. The uses are endless, but some of them may include benches, retaining walls, shelters, or structures. Play around with your design and see what works, then go back and try it again! The great thing about 3-D modeling programs is that they aren’t built yet, so you have the flexibility to try different ideas. WATCH >>> Intro to Rhino 5 – Extruding Along A Curbe – The Tutorials for Landscape Architects
5. Lands Design – Rhino Plug-in Lands Design is a landscape architecture plug-in for Rhino. It is really helpful to get a rough visual of a site with vegetation that you design. The plant database allows you to insert plant species and specify every detail, from age, scale, length, thickness, branch length to crookedness. The plug-in creates a fully customizable landscape program that gives your design more flexibility and character in the 3-D world. If used with the Flamingo nXt plug-in, this program can help create beautiful 3-D visualizations from Rhino. It allows for a variety of rendering options to customize your design and its presentation. Go to this YouTube channel to find more videos of how to use Lands Design. WATCH >>> Lands Design Rendering & Visualization
4. Grasshopper Introduction Grasshopper is a confusing but useful tool to use as a plug-in in Rhino. It uses numbers, formulas, and manipulators to create geometric concepts. It is certainly not a substitute for design, but Grasshopper can help create geometric forms through parametric design (using constraints to design a model). There is no one tutorial for how Grasshopper can be applied to landscape architecture. It truly depends on the project and site, but it does provide the opportunity to explore different ways of looking at the design process. WATCH >>> Grasshopper Tutorial Video 001
One of my studio projects used Grasshopper to simulate tides in Newark Bay – it is an amazing program to test interventions within existing systems. A video of the simulation can be found here. 3. Flamingo nXt Rendering in Rhino Flamingo nXt is a photo-realistic rendering tool for Rhino and creates powerful images from your 3-D model. If you have enough elements in your model (topography, vegetation, buildings, and structures), you can create an environment in the background to render it into an image. Flamingo allows you to set the background and lighting to create the environment you want in your final image. It is a great tool to make your model look that much more realistic. WATCH >>> Rhino 4 – Flamingo NXT Basic Background Environments
2. V-ray Rendering in Rhino V-ray is another powerful rendering tool for Rhino. The options to select materials and control the direction of light gives you flexibility in the final image that comes out of Rhino. Not only does V-ray give you options for materials, you get to select camera options and rendering quality. It is a more powerful tool than the basic render that comes with Rhino and will result in higher-quality images with detailed materials. It will create a great base for an awesome Photoshop perspective! This YouTube channel has other tutorials that go in-depth into the different tools V-ray has to offer. WATCH >>> [Vray for Rhino Tutorial] 01 VRay Intro
1. Rhino to Photoshop Once you export any image of your model from Rhino, it will probably need a little more work in Photoshop to perfect your perspective. Rhino is one of the best tools for getting the framework of your design, but Photoshop can push it to the next level. Play around with filters, lighting, color, and mood in Photoshop to create a convincing perspective that will sell your design. And if you are showing a landscape, be sure to put in people! Once you populate the perspective with people (don’t forget their shadows), it will subconsciously convince your client that this will be a successful landscape. Watch this video to learn some techniques that will create a photo-realistic image. WATCH >>> Architecture Visualization Render | Photoshop Post Production 2
Rhino is a powerful 3-D design program where you can accomplish anything from visualizing to testing design ideas. A 3-D model opens up endless possibilities to analyze a site and test ideas. It is also a powerful communication tool; people love 3-D models and are always impressed with images from them. It is just easy to visualize a design if you have explored it three-dimensionally — proof you can show the client. Just make sure you save your work constantly! Iteration copies will be your best friend. What is your favorite tool in Rhino? Go to comments Recommended Reading:
- Drawing for the Absolute Beginner: A Clear & Easy Guide to Successful Drawing (Art for the Absolute Beginner) by Mark Willenbrink
- You Can Draw in 30 Days: The Fun, Easy Way to Learn to Draw in One Month or Less by Mark Kistler
Article by Nick Shannon
Published in Blog


Pingback: tutorials photoshop youtube - Kumpulan Tutorial Internet Marketing