Have you ever taken a photograph and uploaded it only to find out later that someone has photo bombed your family photo or the exposure wasn’t right on that killer landscape shot? You are in good company.
Whether you are a seasoned professional or a selfie guru, it is inevitable that some of your photos will be botched. Don’t worry. Landscape Architects Network has a few Photoshop tips that can help you redeem your lazy photography habits.
Landscape Architects Network reached out to European travel photographer and editor at HDR One Magazine Jimmy McIntyre and American nature and design photographer J. Paul Moore or their tips for the Lazy Photographers Guide to Photoshop. Here’s what we all came up with.
Use Adjustment Layers to Make BIG changes
The first set of tools that you need in your Photoshop arsenal is the adjustment layers. Gradients, brightness/contrast, hue/saturation, and gradient maps are a few of the many adjustments which you can leverage to enhance the mood and feel of a photo. These tools can be accessed by opening your adjustments panel on your right tool bar or by clicking on the circle that is half way filled with black and white at the bottom of your layers panel.
Let’s dive into Brightness and Contrast. Once you click on the appropriate icon or layer adjustment you will see two slider bars. Click, hold, and drag these to the left and right to alter the image. A simple way of understanding brightness is thinking of it as a tool to lighten or darken the overall image. Contrast increases the difference between the light and dark pixels. This achieves a look of high intensity and greater color saturation.
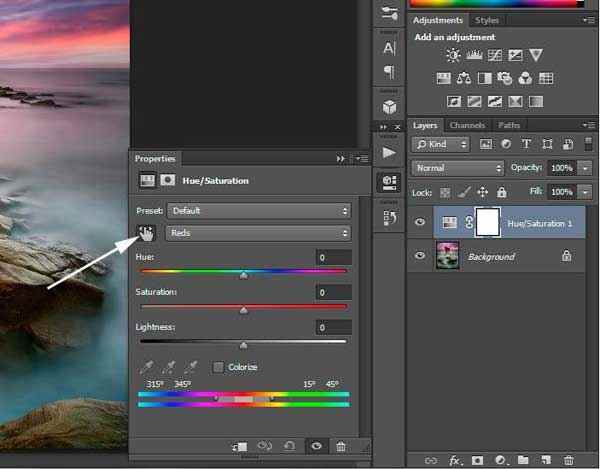
Image credit : Jimmy McIntyre, Using saturation to make dramatic changes and improvements to your photos
The next adjustment layer to arm yourself with is Saturation. Jimmy McIntyre had this to say:
“Firstly, when you want to quickly saturate or desaturate a particular colour, open up a saturation adjustment layer, click on the hand with two arrows either side of it (next to the word ‘Master’), and then move your cursor to your image, select the specific colour and while holding the left mouse button down, move the cursor left or right to desaturate or saturate that colour.”
This is one of many fantastic ways to make black and white images or enrich a photograph’s color.
Making Good Use of the Tool Box Panel
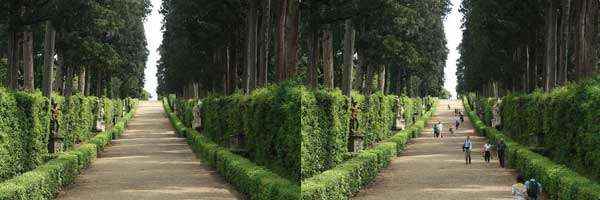
The second set of tools that you need to become familiar with is the Tool Box Panel. This panel includes healing brushes, the clone stamp tool, the history brush, and more. One tool that many landscape architects are familiar with is the Clone Stamp tool. This tool looks like a rubber stamp and is often located on the left side of your screen. Use the clone stamp tool to remove or add desirable and undesirable parts of a photo. Check out this before and after shot where a person stepped into the view.
Here’s how you do it.
Step 1: Create a new blank layer by clicking “new layer” at the bottom of your layers panel.
Step 2: Click on the clone stamp tool. At the top of your computer window find the word “sample.” Click into this drop down menu and select “all layers.”
Step 3: Next, place your mouse over the portion that you would like to clone. While holding down the Alt (PC) or Option (Mac) key, left click on that area and release the Alt or Option key and the mouse clicker.
Then…
To stamp that area, place your mouse pointer over the area you want to alter and left click, hold, and move your mouse around. This stamps the desired area here.
One Final Tip
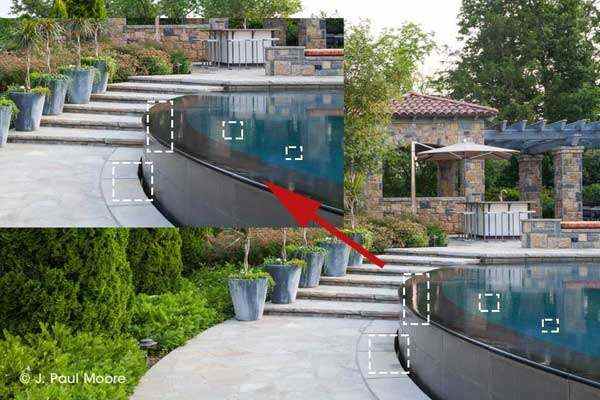
Our final tip comes from J. Paul Moore. He shared with Landscape Architects Network the usefulness of the Content-Aware Move tool. He used this tool to “eliminate water spots by the pool, remove bright reflections from the edge of the pool caused by the umbrella pole, and to fill in a few small spots on the left side of the far left arborvitae.” This is a useful tool to help control the viewers’ attention.
To use this tool, click into the spot healing brush drop down on the left tool bar. Once you have selected the Content-Aware Move Tool find a spot on your image which you would like to reference. Trace the spot with your mouse cursor. Then click this selected area and drag it over the area you wish to alter.
We hope that these tips for the Lazy Photographer have been helpful. Photoshop is a powerful tool for photographers and landscape architects. Have fun!
J. Paul Moore Official Site
Through Strange Lens
Related Articles:
Article written by Cameron Rodman
Published in Blog


