


Author: Frank Varro
An Advanced Course in PC Hardware: $1,000 Performance PC with Style- Part III
So far I have given you a break down of what I need overall, and most of the system specifics. Today, I am going to run down the rest of the build.
Component #6: Power Supply
Part of planning for it is getting enough power. New Egg has a calculator ( http://c1.neweggimages.com/BizIntell/tool/psucalc/index.html) to help you figure out your power supply needs. One thing to keep in mind is to look at both what you are building now, and what your optimal load out is. I built MY machine knowing that I was going to overclock my PC and add a second graphics card, so I got a massive power supply. This machine will not be overclocked, but might get a second card, so I will plan ahead for it. I put the specs for the build in (I put a performance MB in to play it safe), and got a moderate 477 Watt rating. This is fairly middle of the road, but already can give you a sense of one of the advantages to building your own system vs. buying a pre-built with plans to upgrade later. Pre-built systems often have the smallest power supply possible, so if you want a new, or second graphics card, you are also buying a new power supply. So for a baseline, right now, I need a 500 Watt power supply. If I add that second graphics card, and go to 4 sticks of RAM? 674 Watts.
Now you know the size you need, but how do you pick one? Hell if I know. This is where looking at customer ratings is key. New Egg is pretty good about it’s ratings, actually sending out emails asking for reviews of items you have bought from the site, and when looking at the text reviews you can choose to only see verified owners (the people who bought the component from New Egg). Take the Corsair brand TX750. I picked a Corsair because they are a well known brand, and I bought one of their supplies for my own build. This has enough plugs to run two graphics cards, and enough power to run them, plus a second optical drive if I go nuts. The second thing to do is look at the ratings. I always start by reading the low rated reviews first. This will give you an idea of if people had the power supply frying on them after some use, if people were getting units that were dead out of the box (therefore not hurting other components, and returnable), or if people were buying the wrong thing. This has a rating of 4/5 with 300+ reviews, 47 of which are 1/5. About 1/2 of the bad reviews were for DOA units (which seems to be fairly average), and some more had issues running out of the box and then died. I’m not to worried, so I would still go with it, but this is where you have to just do some homework, pull up some alternatives, and see how things compare to each other.
Component #7: Hard Drives
As I mentioned before, the trick with a hard drive is finding the balance of speed, power, and price. What some people don’t think about is the fact that this isn’t necessarily an all or nothing game. If you need a LOT of space, and have a moderate budget, it doesn’t mean you are doomed to slow speeds. One of the more popular things now is to get two hard drives. One, a very large, moderately fast, but affordable drive to keep all of your files on, and most of your programs on. Second, you get a smaller, much faster Boot drive (What they Operating System boots off of). Depending on the size, you may also be able to put a few of your more important programs on here. The key here is to remember that programs, when it comes down to it, are massive libraries of files. When you use something like Photoshop every-time you decide you want to use a filter, it needs to run the program for that filter. Unless the filter’s program is in the RAM because you are using it for a second/third time, the computer needs to run around, find that part of the program, and run it. If you have the program on a slow drive, it will take a bit longer to find and retrieve. However, if you are running thousands of these subroutines a day(which if you use one program often, you probably do), this will add up.
So, my advice would be to get one large traditional Hard Drive, and one smaller Solid State Drive to boot off of. For the large drive, I am picking a Terabyte- it’s what I got for my build, and 2 years of Photoshop and 3D models later I still haven’t had to run around clearing space. It’s a beautiful thing. For the main storage drive I am selecting the Western Digital 1TB Black SATA III. Western Digital and Seagate are the longtime brands for Harddrives that I tend to lean towards, and with a 5 year limited warranty, 2000 reviews averaging 4 /5, and a forty dollar discount at the moment, that’s good enough for me.
The Solid State drive I would shoot between 50 and 100 Gb. This will be enough to take your O/S and a few programs, but shouldn’t be getting into the insane price ranges. For this build specifically I want SATA III for at least the SSD, as that will allow me to take advantage of the faster drive speed with faster data transfer speed (When in doubt, look for bottlenecks in speed.) Right now on NewEgg I can get the OCZ 2.5″ SATA III 60Gb (AGT3 model). It is a moderately priced 60 GB SSD drive from one of the most well known SSD makers around. This drive has 4/5 on NewEgg with 546 reviews, and its on sale for $62.
Misc.
This stuff is based a bit more on sale prices and brand name/reviews for me, so it’s pretty flexible. You need a Media drive, and a wireless card, plus a mouse, keyboard and monitor(or two) if you are building a rig from scratch. You may decide that you want to go with a Blu Ray drive, and forgo the burner option, or you may want to pony up the big bucks so you can burn BluRays (burner’s are in the $70-$130 range), but I am going to stick to a simple DVD-RW. Realistically, find a drive from a brand you know, with decent reviews, that is cheap. You should be in the $15-$25 range with no problem.
When you get a wireless card, the main thing to keep in mind is what your signal needs are. WiFi is rated as A, B, G, or N. A and B are kind of hard to find, and slow. Today, you will mostly see routers and cards that are G, or N. One good thing is these are all backwards compatible to the less powerful ratings (A is lowest, N is highest). So if you have an N router and a G card, or a G card and an N router, it will still work, it will just be throttled to that G rating. For most everyday use, G is fine. However, N is roughly 10x as fast, and has 2-3 times the range. So if you are moving big files, especially within a local network, or if you have a tricky time getting a great WiFi signal, move up towards N for both your adapter and your router. I have a G router, and this is a local work machine, so it won’t be downloading any movies either, so I am going to stick to a simple G card (PCI Express) for around $20.
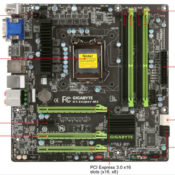
Another thing to keep in mind: the number and configuration of the PCI slots on your motherboard. Because I went with the Micro-ATX, the board I picked only has 3 slots, which are arranged in a way that means if I do run two graphics cards, there will not be room for my WiFi card. One solution is to get a USB adapter, another is to buy an ethernet cord and hard-line your connection. Its not a huge issue, but it’s an issue that you need to think about before you start buying things.
Picks:
CPU: i5-3450 – $195
Motherboard: GIGABYTE G1.Sniper M3 – $170
RAM: (DDR3 1066 240 Pin,) Corsair Vengence 8GB (2x4Gb) – $52
Graphics: GIGABYTE GTX 560 – $180
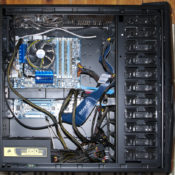
Case: Fractal Design Define Mini Black – $100
Powersupply: TX750 – $110
HDD: 1TB SATA III WD Black – $110
SSD: OCZ 60 Gb SATA III – $62
Optical: DVD burner – $20
Wireless: – $20
Total: – $1020
With a DECENT mouse and Keyboard, and a couple of good ~20″ monitors, that should put you right in the $1,600 wheelhouse. For a machine you should be set with for YEARS.
Next time: Putting it all together…

An Advanced Course in PC Hardware: $1,000 Performance PC with Style- Part II
Last time I ran through the basics of what I need. Now it’s time to really start picking components to build my system.
Component #1: Processor

I would start picking components with the processor. This is one of the components that is tougher to upgrade once a machine is built, and you need to make sure you get what you want. I am going to go with the i5-3450, which Toms Hardware ranked (in September 2012) as the best processor for the $150-$200 price range. I went with this over a slightly cheaper or more expensive one for a few reasons. In terms of more expensive options, the next-best choice up is not $40 better on the surface, but when you get into overclocking and things of that ilk. I have no plans to go there with this rig, so that’s wasted cash basically. Beyond that, you get to diminishing returns, and to get a modest increase in performance, you could either tune a $240 chip, or buy a $1000 chip. It seems the bottlenecks start to lie else where in the system at that point. I also generally wouldn’t go to the next tier of processor down, since as I mentioned before, apart from overclocking your processor, you cannot easily upgrade your processor, so spend the cash for quality parts now.
Component #2: Motherboard
 Next up is finding the motherboard you need. It needs to fit the processor you have picked, have expansion room for the graphics/WiFi cards you want now, plus possible expansion, and be able to support the RAM load you will want. It also needs to have the ports for things like USB’s and HardDrives that you want. Make sure the connector types you want (USB 3.0, SATA III) are supported. This is honestly the weakest part of my component understanding, and I tend to really scour NewEgg and Toms Hardware for recommendations, in general, and as a match for my specific processor.
Motherboards are also very important because the motherboard size will determine what case sizes you can use. I managed to find a few Micro ATX boards that should still give pretty great performance, while allowing me to look at a smaller form factor. I went with the GIGABYTE G1.Sniper M3 because it offers a few more connections I was looking for, for not much price increase.
Component #3: Case
 This is a tricky pick for very different reasons then the rest of the components. This is the part that you will be looking at day in, and day out, for the next several years. Unless you choose a case with a window, you’ll never see the rest of the parts you pick apart from an occasional can-of-air clean out. You also need it to handle the various parts you want. Because of this, I went with Fractal Design’s Define Mini. It has a clean black look, is designed to keep your system quite, but if heat becomes an issue it has openings you can open, allowing more noise out, but more air in, even adding additional fans as needed.
Component #4: RAM

Because the motherboard I selected runs the RAM in dual channel, you want 2 or 4 sticks of RAM in at a time to allow them to run at the fastest speeds possible. I have used Corsair memory a few times, with no complaints, and selected one of their 8Gb packages, the Corsair Vengeance. It runs at the max speed my motherboard can handle (1600), and would allow me to buy another pair later to up to 16 Gb if I wanted, although that may well not happen unless this turns into more of a 3D graphics rig than it is currently intended to be.
Component #5: Graphics Card

For the graphics card, I am going with a mid-line choice, but that could be run in tandem with a second card to create a workhorse in the future. One of the best choices according to TomsHardware is the GeForce 560 from NVidia, coming in at “just” $170. Not only is it a great card on it’s own, but it also got an honorable mention as one of the best cards for ~$330 when run in tandem(called SLI for Nvidia cards, and Crossfire for ATI cards. There are some differences in how they run, but unless you are going pretty high end, you likely won’t see a huge difference.). I doubt that will be an option I will go with in the future, but it’s good to plan for it now. The card is normally $179, but at the time that I’m writing this, there is a $20 mail in rebate. You have to remember to file it, but it’s things like these that REALLY help, as that basically bought you your DVD drive.
Next Time: Components II

Part 1: An Advanced Course in PC Hardware – $1,000 Performance PC with Style
A while back, I started a series on how to build your own PC based on my experience building my own rig. I’m going to pick that up again, but as my build is a year and a half old at this point, I’ll look at what I would build today, and what I could get off the shelf for the same price. As I already have my gaming/graphics rig, I’ll be looking at what I would build for my wife, who is also a Landscape Designer/Planner.
This means there are a few key differences in what I’ll be getting. For my machine, I bought one of the largest towers I could find to get the best cooling, and expansion potential, possible. Amy doesn’t want a box that is 22″x22″x9″ sitting on her desk, so I will be looking a bit more compact. She also doesn’t do as much 3D work as I do, so I might go a little lighter on the graphics card than I might for mine. The first step is to set a budget. I’ll look at a budget a bit smaller than the $1,500 I used for my build: $1,000.
Protip: Wait for sales. I saved around $300 on my build by putting trackers on items I was looking at on NewEgg.com. I got a package with almost the exact RAM I was looking for for free with the exact motherboard I wanted, just by waiting a couple weeks. Which brings me to my other tip: NewEgg.com is your friend.
 Right off the bat, as a windows family, $140 is gone to pay for Windows 7 Professional (64 bit) from NewEgg (Windows 8 has not been released at the time of the writing of this). Its important if you are building a new PC at this point to get a 64-bit OS. Among other things, it allows you to use more than roughly 3.5 Gb or RAM, which is the most a 32-bit system can see.
Now, if you just dive into shopping and try to buy a bunch of things, you’re going to get scared, and hide; unless you are a total hardware guru, at which point I am flattered that you are reading this, but it probably won’t help you a ton. Along with NewEgg, I am also a huge fan of TomsHardware.com They do a series called “System Builder Marathon” where they do something similar to this, at three different price levels, roughly every 6 months. They also have very good, in-depth reviews of much of the best hardware around. The trick is, they may have done their latest builds 4-5 months ago, with budgets that bracket what you have, and that are designed to do something else. It can be tricky to navigate a $2,400 Gaming rig and a $1000 Media server if you have $1,500 for Photoshop and CAD. They however, are great places to start, and to make sure you don’t forget some vital piece of hardware.
 There are two places you can start looking at your build: guts, and Case. If exterior style is the most important thing, and you don’t care if it has much power, start with the case (as would be the case if you were building a Home Theater PC that just serves to play music and movies). You could find a tiny case, or one that is small and brushed steel if that’s your style, but it may not fit components you otherwise need. I need this machine to do some decent work however, so I’m looking first at things on the inside first.
What do I need on the inside of this?
- Looking through reviews, I really am liking the sound of the Intel i5-34xx series (part of the new “Ivy Bridge” line), so that gives me a starting point for the CPU.
- It will also start to point me towards and away from certain motherboards based on compatibility. Motherboard size is one thing which will determine what cases I can use.
- I will need at least one graphics card, so I’ll need a case with a decent amount of space, and a Mother Board that has at least a few PCIe slots.
- I have software on disk, so I need at least a DVD burner.
- At least 1 Harddrive. It would be nice to do two, one large traditional drive, where GB are cheap, and one smaller Sold State boot drive to speed up everything, where GB are expensive. (Would love one huge Solid state, but as even a 240 Gb drive would cost in the $200 range, I’m out of luck)
- Oh, I need RAM and a Power Supply, but those have little effect on the case.
So I need at least 3 drive bays, and room for 2 PCIe slots for a large graphics card, plus it would be nice to have an extra PCI for a WiFi card.
Next time: Choosing Components I
Design Studio: Project 1, Episode 3
This week was busier than I would have liked, what with tax day and Portal 2. I did want to give you a quick progress update however.
I tweaked some of the major areas in my deck and public turf area, refining shapes, and moving the parking slightly. The combination of the changes create spaces that are more vibrant, draw your eye towards the areas you want to look, and have good spaces created for gardening and herbs (Sea Foam Green).
I then set about working on the back yard area. I knew I wanted a path leading out to my private space and to the river edge. I also wanted to include screening and a place for flood water to be cleaned, infiltrated, or at least slowed down. I also wanted it to be something visually striking. I have created a raised decking path and small deck area, above what is essentially an infiltration basin. It would be planted with drought tolerant plants in higher, normally feet-dry areas, and wetland plants in feet wet areas near the bottom. What really sets it apart, however, is a small detention basin at the base of the wild area. This should remain filled most of the year, and is edged by stone, creating the look of a rectilinear pond in a biomorphic wetland.

What you end up with is a geomorphic series of spaces for people, witch overlap with biomorphic and rectilinear in areas where the human space interacts the most with the “natural” areas.

This is still all conceptual, including the rough sections, so for next week I am hoping to get down to brass tacks and start doing the detailed design work.
Until next week.
Design Studio: Project 1, Episode 2
Now that I have a site and a client, the first thing to do is to walk the site, and create a site analysis based on what the client needs and what the site and borrowed landscape provides. My first cut at the site analysis stayed at a large scale and was somewhat bold.
This analysis was made with Sharpies on a trace sheet laid over the base map, and serves as a first step to get the big issues onto the page. I then stepped down to a more detailed analysis using a wacom tablet on my PC. This allowed me to work on top of both the base map, satellite photo, and my first analysis map, all with variable opacity, while still having the control/feel of a pen.
This analysis map is what I used for my conceptual design phase on a site scale. This would still be for internal use in general, and would be supplemented by fine detail analysis maps if needed. The text is also a good indicator of my current skill with a tablet, as I do not have the best handwriting, but the wacom only makes it look worse at this point.

Now that I have a working analysis map, I’m going to work on programming of the site, and conceptual designs. The program I came up with preliminarily was to have a large space for entertaining that would also function as a semi-public space, like traditional shared backyards. In most of the concepts I also looked at more of a private outdoor space, both as more of a contemplative area, and as an area for small gatherings/date nights. I wanted to include a small garden for both vegetable and herbs for cooking, and at least one turf area for any future kids/dogs. I also wanted to make sure I included an area for infiltration and slowing of any flooding behind the garage. Once I had these basic building blocks, I started the conceptual phase with a method one of my professors was a huge fan of: 10 conceptual designs in 10 minutes. Admittedly, I took more like 20 minutes, but I still got good results.

This method forces you to rethink ideas you already had in your mind. To come up with 10 distinct ideas in a short amount of time you are forced to think about things in new, and a more instinctual way. Also, after five or six conservative concepts, its gets easier to go nuts and do something a little more off the wall. I took these concepts, and decided I wanted to explore the idea of a raised deck as the private space in the rear (from Concept 4), and the idea of a deck with planters built in for shading and easy herb access (Concept 5). I also wanted to look into making the “party parking” into grass-pavers, which would increase my usable turf space greatly in the narrow yard.
On a technology side-note: I was somewhat surprised with how well the Wacom worked for this process. In some ways I had no real hope for it replication the experience of pen on paper, but it actually did a good job. There are some drawbacks- fine pen control is tougher and requires another level of hand-eye coordination that even my gaming-trained mind does not quite have, and unless you buy an expensive model, you are drawing on a smallish 5″x8″ area instead of a sheet of trace the size of your table. However, there are some benefits as well. You can easily make a pallet of pen colors based on what the program is, and have more options than Sharpies would give you, with quicker color switches. You can also either draw everything on one layer, or each part on a different layer, so if you like one part of a concept, you can just edit other layers, leaving you favorite untouched. You also have the power of a perfect eraser and undo, so anytime you draw a bad line, with a single click it is completely gone.
Back to the design, I then pulled the two pieces I liked into a single file, giving me an idea of roughly what the two part would look like. I then started by rough blocking the rear deck and the infiltration area in the rear, before moving to the house, and tweaking the deck slightly, moving the stairs, realigning the driveway/parking, and trying out routes for a path to the basement door.

I went with this deck shape because not only would it would allow for some elevated views to the creek to the south, but it would also pull your eyes in that direction. The plantings would be a mix of herbs and grasses, providing the deck with slight screening, and easy access to the herbs from the kitchen. In my next edit I tried running the path through the grass paved area, providing the path for when cars are not parked there, and also act as stepping stones out of the parked cars.

I then tried re-aligning the sidewalk under the deck to avoid the intersection being directly at the base of the steps. This was made very easy because my sidewalk was on its own layer, so I was able to completely change the sidewalk layout without having to touch the things I liked, like the driveway/grass pave arrangement.

I then realized that with the path going through the grass area, when people were over there was no choice but to walk through the grass. I moved the path to become a border for the parking, and added a flagstone-ish path to the rear to get it down on “paper”.

I then decided to take a step back, and take another look at the deck shape. I did a quick viewshed/privacy analysis from deck level, noted in hot-pink. The tough call area to the right is because there are new neighbors, and which the yard is a beautiful wildflower garden at the moment, that may quick, and dramatically change this summer.

I then went back and re-looked at the deck, moving the stairs back to the driveway side, and had a path running to the side of the house from under the deck.

This is where I stand as of now: I am still tweaking the deck, but also looking at the turf area, so I can make them play off each-other. This is a good look at the kind of work you can do with the wacom too. I’ve only used it a few hours, mostly for this project, and I’m amazed at how quickly you can try and retry things, which is so important when working with things like geo-morphic shapes. This is after many iterations of the turf area, but because I am using the wacom instead of trace, its still readable.

This week I plan to be at 80% site planned. I should have a few rough sections, and be to the point of detailed design. Let me know what you think, both of the blog series, and the design!
Design Studio: Project 1, Episode 1
Recently, as I have continued my search for full-time employment, I’ve forced myself to take another look at myself in terms of what I can do to improve my chances in the hyper-competitive job market of today. Without boring you with the full list, I’ll just say that I figured out a way to kill two birds with one stone.
Starting today, I am going to run my own design studios. I’m going to run it similar to how some of my MLA studios were. I have 6 weeks to go from site visit to presentation. The presentation style will vary with the project, from Competition Boards to small presentations for home owners. I will always assume an unlimited budget. If there is interest, I may ask readers to act as clients, giving the basic programmatic desires, etc. I’ll be making weekly progress blogs as the project continues, culminating with the posting of my presentation graphics. And lastly, if anyone desires, I encourage other to take part, and post your own progress blogs.
Project 1: Connecticut Residence
My first project is a private residence near the coast of Connecticut. I will be presenting the design here on May 13th. As it is a private residence it will consist of a few small boards, and maybe a simple powerpoint.
The owners are newlyweds who just purchased the house. They are fond of arts-and-crafts style design as well as elements of prairie and modern design. They don’t have any kids, but would like to have a couple in the future. They enjoy spending time outside, and would not mind a garden that would benefit from some basic attention. They are both ecologically minded people, and would like a plan designed with sustainability in mind.

The clients are happy with the front yard, which has a blue-stone walk leading to the porch. They also like the color from the large Japanese maple, and the Vinca that is the ground cover for much of the yard.

There is a grade change of about twelve feet from the front to the back yard, with the driveway on the north side of the house, and a Vinca planted slope on the south. The backyard has a small deck that the clients would like to redesign for small parties and a barbecue. There is a two car garage, along with paved room for two additional cars to be parked with no one being boxed in, which they would like to keep for entertaining, but they are not in need of most times.

Just over 100′ from the back of the garage is a small river. Along with the challenges this poses in terms of protected buffer zones, it also is an issue because it floods badly some years, sometimes jumping its banks at bend in the river from when it was a mill run, down a street, and behind the garage, at times dumping gravel for driveways along the way.

Neighbors downstream have yards that are mostly turf up to the river bank. Upstream there is a house that is in mediocre condition near the river bank, well within the 100′ buffer line. This yard has a wooded area along the river.
I’ll post the site analysis with rough topography soon, along with the first conceptual designs next week.
Graphics VS. Design, and what I learned from video games
A few weeks ago I posted a blog asking for critiques on some 3D models components I had made. I posted it on IGN, WordPress, and Land8Lounge. The response was fairly low, and I tried posting it as a discussion thread on Land8Lounge as well. This got some helpful comments, but it also possibly inspired a thread that brought up the issue of rendering VS. design in Landscape Architecture. This question came up a few weeks ago at a networking event for NYC landscape architects, and I talked to a few different people about it. It made me wonder: Why is it that designers often have a negative reaction to “high end” renderings?
If I said I had never seen a rendering and assumed that the graphic quality was hiding something I would be lying. I think this often comes from past experience, either in firms as CAD monkeys, or in school. We, I think, have all had a presentation where we worked our ass off to the last minute perfecting a design, leaving little time to get perfect graphics, so we go out with what we can, trusting our peers and other trained professionals to see through the pencils lines to the heart of the design beneath, only to be disappointed. We have also all had the time when we have seen the person slap together a half-assed design, but with pretty pictures, and when we are counting on our bosses and teachers to see it, they instead get “blinded” by the crisp lines, hypnotized by the texture work, and in a trance from the shadow quality. I think it’s this shared experience that leads so many of us to distrust pretty drawings: we all know just how easy it is to lie with graphics. Whether it is drawing a plan that doesn’t show steps because they client didn’t want them – even though it’s not physically possible, screwing with perspective sizes, or hiding views that you don’t want noticed. We know the tricks all too well; in part because we use them to some extent ourselves.
We choose a rendering style based on what we want to show and not show: Computer graphics traditionally show a Utopian version of everything – where it all looks fresh from vacuum -packaging, but it makes the space look more contemporary to clients; Hand graphics hide views by simply not drawing the far background, but show more flow and life in the space. We choose views that may not show the space in the best ways, but show a feature we want to emphasize over others. It’s a limit of non-physical models – you have a finite window onto the world, you are going to be careful about what you choose to show to show off what you want to be seen. The problem is, we need a way to easily communicate to clients, and in forms other than physical models, and clients who have not been trained as designers get the best feel for a space through perspective drawings.
-Utopia?
So the issue becomes not graphics VS design, because it never really was outside of designers’ heads. The issue is how can we make graphics that communicate effectively, and manage to not fire off alarm bells in designer’s and client’s brains.
Personally, I choose to concentrate on computer graphics over hand graphics not due to a lack of skill (believe me, if I put the time into drawing that I have put into rendering I’d be pretty good with a pencil), but because in my mind, it is the most honest form of representation. If I model everything the way it is – which I can with no extra effort – I know exactly what I will see from a given view. I can put a camera inside your eyes when you are sitting on a bench, and if you would actually see a sliver of that utility box, it’s going to be in the rendering. The problem is, it would still set off alarm bells, all because of an effect that is becoming well-known in the media worlds of movies and video games.
The “Uncanny Valley” is an issue that became most well-known a few years ago when the movie “The Polar Express” came out.

It’s the theory that as things become more realistic, they become more familiar, but only to a certain point. Once things become TOO realistic, small things that are wrong make us cringe and react negatively. In “The Polar Express” the thing that set people off was the eyes. For all the realism the characters had, from mannerisms created by directly copying from actors in Motion Capture suits, to careful texture work, the fact that the eyes didn’t glisten correctly gave them a dead look, and made some people instantly see, instead of a heartwarming children’s story, a movie about a train filled with zombies… (note to self – Make a movie about a train full of zombies. “Brains on the Orient Express”?)

In the ensuing years movies, and video games, have dealt with this issue in one of two ways. Some have gone the route of making themselves, while beautiful, purposefully unrealistic. This brings thoughts of movies such as “Up”, and games such as “Little Big Planet 2”. Neither of these tries to be realistic – the characters look like cartoons, but with realistic flesh-tones (or woven sack-tones in the case of Little Big Planet), elements.

The other method is to continue to push the boundaries of realism. Movies like Avatar skirt this method by having realistic aliens that we have no internal reference for as digital characters. Where true realism is pushed the hardest today is in gaming. Games like Uncharted 2, Heavy Rain, and Read Dead Redemption push realism in gaming past where it has been before. As some of the best looking games widely available, they all have one thing in common.
Grime.

None of these games are set in pristine areas. They all are set in places that have been lived in, that have wear and tear, grease and grime, chips and gashes. I think this is one of the essential things to making a convincing 3D rendering, and one that doesn’t make you think you are being tricked by graphics. The splinters out of the wood crate, the dirt on the boots, the powder burns on the pistol, all give it a realistic feel.

If that detail is paired with a render engine that has more than 1/30th of a second to output, it would give amazing results.
And those are the kind of results that I think we, as designers/graphic artists have to work for. Gone are the days of the pristine landscape with rows of identical, perfectly pruned trees. If we want buy-in from clients, and from other designers, we need to show all the blemishes on the face of our designs. Whether it’s the ugly light industrial building that is visible through the trees, or the mottled color in the bricks, these are some of the things that A) will affect the spirit of place and B) that will create a sense of life in our renderings.
Are hand graphics still valid? Of COURSE they are. Neither hand graphics nor computer graphics is inherently “better”. They are just different. The grime and dirt of the world in computer graphics is no different then adding a little of every color to a tree in a Mike Lin style render.

It adds a little depth, and a spark of randomness that is what makes the world what it is.
Uncanny Vally image from http://ntlkdesign.co.uk/blog/
Little Big Planet 2 image from littlebigplanet.com
Mik Lin image from Beloose.com
All other images from IGN.com
An Advanced Cource in PC Hardware: Choosing Components
The first step in picking what components you want in your computer, whether you are building a custom setup, or buying one off the shelf, is looking at what software you expect to use. I was looking for a rig that would work for Photoshop, AutoCAD, SketchUp, Thea Render (3D-Rendering Engine), and of course, games from time to time. The next thing is to figure out what each one of these software packages rely on most heavily- Processor, RAM, or Graphics Card.
Photoshop
Here are the system requirements:
- Intel® Pentium® 4 or AMD Athlon® 64 processor
- 1GB of RAM
- 1024×768 display (1280×800 recommended) with qualified hardware-accelerated OpenGL graphics card, 16-bit color, and 256MB of VRAM
The newer Photoshop versions make use of graphics cards more and more, but in bigger file sizes they also rely heavily on Processor and RAM. The amount of layers, filters, and file sizes you normally work with will determine how much of either of these you need. As I am looking to do plan graphics, printable high quality at 36″ x 48″, with many (40+) layers, I, in short, need a LOT of both RAM and Processor.
AutoCAD
The stated system requirements for 64-bit AutoCAD11 (2D) are:
- AMD Athlon 64 with SSE2 technology, AMD Opteron® processor with SSE2 technology, Intel® Xeon® processor with Intel EM64T support and SSE2 technology, or Intel Pentium 4 with Intel EM64T support and SSE2 technology
- 2 GB RAM
- 2 GB free space for installation
- 1,280 x 1,024 true color video display adapter 128 MB or greater, Microsoft® Direct3D®-capable workstation-class graphics card
First, you can run a PC at either 32-bit or 64-bit, 32-bit can only see up to 4 Gb of RAM. Generally if you are building a new system you will go with 64-bit to increase the amount of RAM you can use now, or could upgrade to in the future. None of these are amazing stats, but the RAM is slightly more powerful than the rest of the system- if all the components were equally important I would expect to see a Pentium 4 paired with 1 Gig of RAM and a 256 MB Graphics Card, or a P4 3.0 GHz (processor speed)/Dual Core Pentium 2.0GHz, 2 Gig RAM, 256 Meg Graphics Card. This basically tells me that for 2D CAD the RAM is a bit more important than the Processor (which comes more into play with CAD’s modeling tools), and that while you need a Graphics Card, it does not need to be a great one by any means.
SketchUp
Recommended resources:
- 2+ GHz processor.
- 2+ GB RAM.
- 3D class Video Card with 512+ MB of memory or higher. Please ensure that the video card driver supports OpenGL version 1.5 or higher and up to date.
*SketchUp’s performance relies heavily the graphics card driver and it’s ability to support OpenGL 1.5 or higher. Historically, people have seen problems with Intel based cards with SketchUp. We don’t recommend using these graphics cards with SketchUp at this time.
While Processor and Graphics card are needed, RAM is the biggest limiting factor, in my experience, when you have large scale and or detailed models.
Thea Render
I could not find any system requirements, likely because the program is still in beta (testing phase), and while it currently only uses Processor and RAM, they are adding Graphics Card based rendering in a future update.
Games
For this I took the example of one of the newer PC games that has come out, and one that I wanted to be able to run at full bore- Civilization 5.
Minimum system requirements are:
- Intel Core 2 Duo 1.8 GHz
- 2 GB RAM
- 256 MB nVidia or AMD Graphics Card
When running it with these specs on a laptop I could play it, but far from maximum settings. The recommended settings are:
- Quad Core 1.8 GHZ
- 4 Gig RAM
- 512 Graphics Card
Gaming is generally more Graphics Card intensive than productivity software, in part because the architecture of the graphics card is better at drawing faster – for better frame rates, while processors can do more math faster. So in an enclosed system like a game where it is working with a small set of parameters, Graphics Cards shine. But when you have many layers of images all affecting each other, the processor takes the lead back.
What am I left with after all this? To get the best out of all my software, I need a good Processor, RAM, and Graphics Card- I can’t save on one to improve the others. I also know I use a lot of this software more intensively than most, and I want to be future proof for a bit, so I need to exceed these system specs. One place where I can save a little money now is in the RAM and Graphics Card. That is because these are fairly easily upgradeable- with the right mother board you can add RAM to your existing RAM without replacing it. Also, with the right Motherboard and Graphics Card, you can run in SLI or Crossfire – a method of tethering two Graphics Cards together in your system, and having them act like one, much more powerful card. The nice thing both both of these is that you can spend, say $300 now on a Graphics Card, and in a year spend $200 on another card, and get nearly the same performance that you would have gotten by spending $700 now.
That being said these are the basic specifications for my new computer:
Processor- Intel Core i7 (Quad or 6 core) with a speed of at least 2.5 GHz and I want the ability to overclock in the future to upgrade slightly.
RAM – 6 Gig (Most motherboards can now handle in the range of 24-36! Talk about future proof!)
Graphics Card – 1 Gig at least, unsure of if I am going to go nVidia or AMD, it depends on the exact card (more later)
Hard Drive – 1TB I use some HUGE files (200 Megs for a single photoshop file), and I don’t want to worry about space for a while. I may do a solid state boot drive down the road.
Optical Drive – DVD RW for sure, I probably don’t need a BluRay drive, as I could add one once burners get cheaper
Motherboard – Needs to fit my processor, and at least 2x my graphics card
Case – needs to fit everything, have great cooling, and have lots of room for additional Hard Drives, burners, and maybe even water cooling (if I overclock in the future).
Next time I’ll start looking at each individual item, and how I picked which to go with.
Ignoring the odd artifacting, this is what Civ 5 Looks like with the laptop:
And this is what it looks like with the new build:

Looking for Rendering Critique
Hey guys,
I’m working on getting a freelance Architectural and Landscape
Architectural rendering gig going using a newish engine called Thea, and
wanted you guys to look at a few of the component models I have so
far. Let me know what you think. The car and bench are tweaked
Sketchup components that I re-skinned, the trees are from Tree[d],
which the exception of the pine, which someone shared in the Thea
forums. The Stop sign is original, and the people are default SketchUp
people, and I’m not sure if they are the way I am going to end up
doing people or not.
I’m trying to get these set so anytime anyone needs a design with a maple rendered, I’m ready to plug this in.
First, the trees. I spend a LOT of time with these trying to get not
just the right bark, the and the right shade of leaf, but the right
translucency, as its what seems to give the leaves a look of life. The
redbud was a real trick since when it is in bloom its a very skeletal
structure, and is VERY pink, but at times it looked almost on fire.
Maple-
Ginko (Young)-

Redbud-

Next is the park bench. I used a Sketchup component, and tweaked the model SLIGHTLY, and reskinned it in thea.

The stop sign is the first piece I made 100% on my own, and I’m decently
happy with. I have NO idea if you can get it to act like there is the
reflective-prism film, so I just made it fairly reflective, but added a
bumpmap so it doesn’t reflect straight back like a mirror.

I’m pretty happy with my car. I got the model in Sketchup, and tweaked it
to smooth some edges, add depth in areas like headlights, and then got
the materials nailed down. The car here has its headlights off, but I
do have two IES lights in the model so I can turn them on for night
scenes.

Lastly, here is everything thrown together in one mish-mash. The key thing here is that the car, for instance, will never be the focal point of a model. so while as a stand alone you see
the polys, when its in a model as a set piece, the fact that it
reflects the model and sits so well really makes it an asset if you ask
me… but I’m not asking me. I’m asking you. so let me know what you
think!

If you like the look of the engine (This is unlicensed version, full will not have the water marks), check out TheaRender.com
A Re-Introduction to Me: Frank Varro
The following is a post I made on MyIGN, a site for gamers. It also serves as a pretty good introduction to who I am in terms of Landscape
Architecture, Design, and Technology, so here you go:
I suppose I owe this post to altoidyoda and justsomedude899, along with a martini and a few High Life’s.
I have been a semi-active member of the IGN community since around 2006,
with a blog I started in 2007. I never posted regularly, as I suppose
I’m to self conscious about my own writing abilities when I don’t have
a bit of a buzz going, but I followed many of the “big time” bloggers
in the old system (Reillymonster, Fozzy, Altoidyoda, Justsomedude,
nextgengamer, dillaweezer, teh_red_baron, etc), and commented enough
that I like to think I had a familiar face at the least. I was excited
to see the new MyIGN as I thought it would become a new iteration of
the original blog community, but it seems that at least so far it is
something more. I don’t know if I think it is something better at this
point, as it feels somehow, diluted, but it is what it is. Some of
this may come from the fact that the old blogging tools were somewhat
of a pain in the ass, and that meant that the only people blogging were
people who really had something to say, and that made it a little more
of a tight knit community. Its the same thing that makes your best
friends often come from the WORST jobs, you suffered through the BS
together, and managed to make it enjoyable. MyIGN is the easy job that
was never hard, and paid decently. You make friends, but, from my
experience, the friendships and comradeship just aren’t as strong as
they were back on the old blog system.
But, I think its time to try to make the move more official, so let me tell you about me. I
started blogging here at IGN because, at the time, I was questioning my
choice of profession. I, at that point, was all-but-thesis for my
masters, and in a job with a small landscape architecture firm. The
commute was murder, and I just wanted to be doing something different.
I remember thinking about how AMAZING it would be to design games back
in the 80′s when I was playing BattleToads and Galaxy5000 on my NES
with my best friend Josh. I moved away from that dream over time,
first deciding engineering was the best outlet for my dual loves of
creativity and science.
Then I took college physics and calculus. I then was looking for a new direction. Luckily, I found
landscape architecture. It is a little understood field that involves
everything I love. On every project you need creativity to create a
design that will inspire, scientific knowledge to know what soils will
work with what plants, engineering to know what to put under and behind
walls to keep them retaining soil instead of collapsing. And you are
working not with “cold” materials like an architect does (No offense,
believe me, I have often thought about going back for an M.Arch as
well), but with the living earth and nature. And you aren’t taming
nature in some god-complex way, but working with nature. Trying to
find ways to create a design that will look amazing both the day you
install it, 30 years down the road when the trees finally are reaching
maturity, and 50 years in when things want to get overgrown. Finding
those balances, and designing so that nature will HELP the development
of your design instead of hurting it is an amazing challenge. I also
brought my LOVE of all things technological to the field, including a
love of 3D Studio Max rendering and photoshop.
Now I am in a VERY different place. I am no longer in Chicago (Hello Queens, NY!),
and, after getting laid-off in August of 2008, I have yet to find
another position in the field. This has been a very sharply double
edged sword. First, I realize that while, yes, I do LOVE videogames, I
don’t really want to be a developer- I just want to be a landscape
architect. And yes, I had time (while working 30 hours a week at Best
Buy) to create a new rendering style, combining the depth that
photoshop gives with the life that hand line-work gets, and I am now
learning Thea and Rhino. But it is really all in the effort to try to
get that extremely illusive job that fits me, a non-entry level,
non-mid-level person with 9 months experience in a field that was
definitely hit by the recession, or even a contract gig doing a few
renderings for a firm that maybe would mean I can stop working retail.
For the time being, however, here I am. I’m playing the few select games I
have cash to spend for. I’m playing some of them on a 360 that my
AMAZING former Best Buy coworkers in Chicago bought for me, and others
on a PS3 I got on Metal Gear 4′s midnight launch (which has since
yellow lighted, and been replaced thanks to Best Buy’s Black Tie
Protection, minus all my saves), and a few on the Wii I bought on launch
day. I listen to Beyond, Scoop, and Knockin’ boots every week
(Knockin’ boots is the new Love-line), and Voice Chat on occasion (Matt
and Bozon are still that podcast to me, and I can’t get around that,
sorry Craig and koopa-lings).
In terms of my gaming background, my first gaming memory is playing “alpiner” on a TI-99 back in the
Early 90′s on vacation in Duluth MN. I then played “Sopwith” on my
Dad’s PC in 1986ish (I’m 29), and soon graduated to an NES, complete
with Power-Pad. I was instantly hooked as a Nintendo Fanboy. I stayed
loyal all the way through the GameCube years (RE4, Metroid Prime, and
Rouge Squadron were AMAZING), and it was only in 2005 when I finally
got a non-nintendo system, the PS2. I got it for DDR, and stayed for
the GT4, Burnout, and Guitar Hero. As I said, I now am lucky enough to
have all three major systems, along with a DS and a PSP (2000). Metal
Gear, inFamous, Uncharted, LBP, Mass Effect, Red Dead, Zelda, Endless
Ocean, and No More Heros are my favorite franchises from this
generation.
In the morning I have to learn another 100 pages of Rhino, and tweak fonts on my resume (welcome to the life of a designer
who is under-employed), and my martini buzz is wearing off, so I’ll
leave this post at that. Hopefully you will see more of me, and with
better news on the employment front soon. Until then, take the time to
sit and listen to some good music. Seriously. Find some good
headphones (throw the earbuds away, your Mom and Dad might have some
decent stuff), put on a good CD (MP3′s sound flat and bassy), I
recommend Feel Good Ghosts by Cloud Cult, or Eraser by Thom York, and
just LISTEN. Sit in a comfortable chair, put your phone down, and
enjoy the music for what it is. An experience.
Tuesday Tutorial: Between a Rock and a Mossy Place
One of the fairly unique features of this site is the granite outcropping that runs along its eastern edge. Giving a feature like
this both realism and readability is something that requires multiple
layers of textures, with manual manipulation required to give it an
organic, natural feel.
I am again using a photo I took as the base for my granite material. This is made more challenging due to the fact that the photo I am using
only has a small area of solid granite, in the form of Belgian block
edging. I selected a few blocks that have similar tones, outlined in
red, and used those as the base for my texture.

I used a mix of both healing brushes to fill in a large area using the existing blocks as a sample area. First I filled in the gaps with
the healing brush, then I used the spot healing brush to smooth the
transitions between the original and the pasted-in areas.

I then repeat this process to slowly spread the area out further until I have a large area filled with granite texture.

This area I then use to create my base granite material by simply cropping out the non-granite area of the photo. I also recommend
looking for any obvious inconsistencies in the texture now, as you can
use the healing brushes to eliminate them now.

You then simply use the same technique of pasting, fading, and cropping that has been used in the previous tutorials.

This texture is smooth enough that I am able to paste it into my image without needing a second layer of texture to mix it with, so for
now simply add the texture into the drawing you have after creating a
pattern.

While this granite outcropping now looks flat, although that will be helped with shading later in this series. However, this is the more
unique portion of this tutorial: to give this cliff some real depth and
realism, it is time to add some north-facing moss. First, Select a good
moss pattern and fill a new layer with that pattern. I selected one of
the turf patterns as the moss layer, as it has about the right color,
and has some good texture depth to it.

I then place this layer above my granite layer, and assign a new, empty layer as a mask. I then re-select just the area filled with the
granite.

You then want to select a brush with… for lack of a better description coming to mind, a spread, clumping form. I used a dual
brush with medium scatter and a low count, as this gives you a good
random spread, while keeping the brush in proximity to the cursor. (The
dual brush essentially assigns a masking brush to another brush, so you
can have one brush with a monster spread that would go to every corner
of your canvas, but then you mask it with a 100 pixel wide round brush,
so the only area the first brush will affect is the area also covered by
the non-spreading brush.)

Then paint what would be the north facing areas of the slope on the masking layer, with the most paint going on the most north-facing areas.

This will start to give a nice additional level of depth to the image, especially once the shading is added later on.

Next time We will tackle the longer grasses that surround the house.

Tuesday Tutorial: Time to get your hands dirty
Dirt is one material that, while rarely fully exposed, is often a base material that other elements are placed over. Many times these elements will have gaps between them where there is exposed dirt, whether it be in a mulch-less planting bed, or in areas like a dense forest as we have here. You cold also combine the dirt with another layer of material, like a scattered moss or leaf-litter, to add some depth and realism. I have used this in 3D models before with good results, but in a 2D rendering it can add slightly more detail than is useful, creating a cluttered look that makes the drawing a little harder to read.
The first process for making dirt is essentially identical to how you make turf. However, the images I selected for this tutorial have some major imperfections that will allow me to show one of the powerfultools in the Photoshop box: spot heal.

You can see here that the first image I am using, from a residential lot, has a large pipe with a string attached that sits in an area that otherwise I would want to use. I could give up, and use a different image, or only use a small section. I did not take the photos intending on using them for this purpose, and therefore only had a few, and I also was only using a small piece from my second image due to the angle and size of the bluestone patio in the image.

As I need some flexibility in size to reduce the tiled look, I opted for the slightly more challenging method of healing the pole and string out of the image. First, however, I adjusted the perspective of the image to minimize scale changes throughout the dirt.

Once I did that, I was able to use my heal brush to remove the pole from the image. In an image such as this, it involves a relatively simple process. First, select the spot heal tool from the main drawing toolbar.

For an image such as this, its best to use the spot heal tool instead of the heal tool. Heal is better when large areas need to be covered using techniques I will cover later in the series. The spot heal tool works by essentially blurring the area. To demonstrate the basic idea, I created a colored grid.

I then used the spot heal tool on the path seen in purple:

This is the result:

So by using this tool, and painting over the pipe and string, you are able to essentially eliminate them from the drawing with very little work, and you now have a much larger area to pull your texture from.

Next you have to pull an area out to use as your pattern.


As you can see, there are some areas in the bottom of the drawing that are much lighter than the rest of the dirt, so you should again use a burn layer and around 8-9% opacity black to paint the areas darker.

This light amount of paint evens out the textures greatly, giving a pattern that will look fairly uniform on its own.

Once you have that, it’s the same method of setting up two buffer areas with guidelines, copying them, erasing them, and then cropping the image down to creating tiles without hard edges.


This material looks pretty good, but when rendered it will likely look a little to cool and dark, almost like rough asphalt. By shifting the image’s saturation, you can get an image that it warmer and a bit lighter.

I took the same steps with the second image, giving me a second, smaller texture that is equal in quality to the first.


By layering these images in the same way as I did with the turf textures, and with the same masking layer pattern, you get a seamless topsoil layer.

Next week, we will tackle the granite outcropping on the west of the site.