Last summer I started blogging tutorials on my new rendering methods in the hopes that it would A) help people looking to do Photoshop plan renderings a starting point to work from, B) cultivate some conversation on other people’s techniques, C) show how much work goes into any given rendering. This was (I hope) successful on at least the first and last count. However, the conversation I was looking for never really started… except in my own head. As I finished my Master’s thesis at the end of 2009, I had to render some additional views of my 3D Studio Max model, and realized how unhappy I was with the textures I had used previously. Colors were over-saturated, tiling artifacts were fairly obvious, and everything just looked off to me.
That lead to some experimenting with different methods of doing things. I had started to play around with using images for my textures some while still writing my original tutorial series. I had mixed the photo with color overlays to soften the image and give it more of the tonal quality I had been looking for:

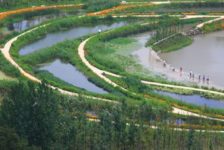
While this solved SOME of the problems with my original method, it still relied heavily on my own eye for color selection. I know this is not my strongest skill when it comes to trying to think of something like: what color is grass, overall, REALLY. I can describe it perfectly well, but when it comes to picking the right color in Photoshop, I just seem to get lost in the sea of options sometimes. It also does not solve the problem of repeating texture tiles. My latest iteration involves not just an image with a color overlay, but two images tiled at different scales and a clipping layer (which deletes portions of the upper layer) with a pattern that tiles on yet a different scale. This creates a photo-realistic texture that is accurate in color, and is virtually tile free.

(Note: Please pay attention to the turf areas- I never re-textured the other areas )
This method is what I will focus on for my next set of tutorials. I also am going to set these tutorials up in a slightly different way. I have a residential project that I worked on in school that was made completely in model- no plans whatsoever. I always wanted to go back and create a rendering for the project as I was very happy with both my design and my model. So, as part of my impending website redesign I am going to go back and, from model photos and the original site survey, create a plan for the design, that I will then render in photoshop. The stages of this rendering will become the different tutorials- Turf, Gravel, Slate, Water, Native Grasses, Shrubs, Roofing, Woods, Cars, and Dirt. Some things will be made by scratch, some will be textures.
So, once I have the base drawn and start getting to work on this rendering, you will be the first to know- by way of NEW TUTORIALS!