


Author: Land8: Landscape Architects Network

How Landscape Design Became the Most Important Feature of Zorlu Center
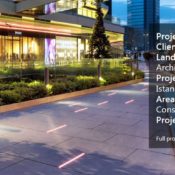
Zorlu Center, by DS Architecture – Landscape, Istanbul, Turkey. Istanbul is a dynamic city in a world of diversity. In light of continuous development, new innovative projects have to deal with the difficulty of harmonization and integration in old structures. In a city between two continents, Zorlu Center unites the historical Old City atmosphere with a futuristic flair of four towers through landscape design. Located in Levent, a business and urban milieu in Istanbul, the private investment project shows a multifaceted use and the variegated benefits of the landscape elements designed by DS Architecture – Landscape. Furthermore, in a context where the controversial issue of shopping malls and public life is becoming more criticized, Zorlu Center tries a new interpretation of this topic by creating alternative urban areas for Istanbul.

Zorlu Center Masterplan. Image courtesy of DS Architecture – Landscape
Zorlu Center
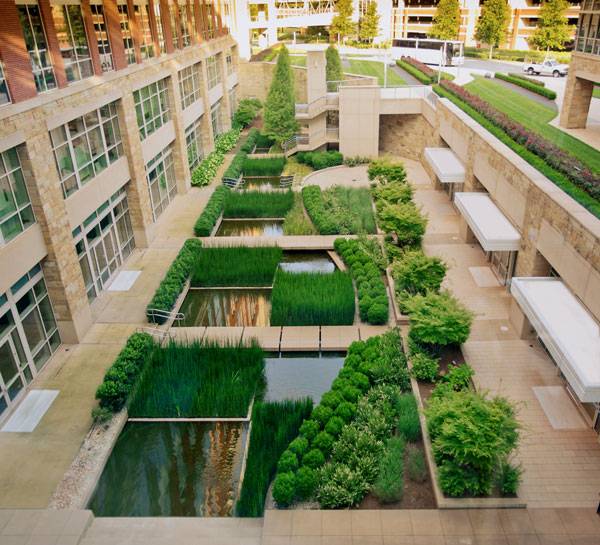
Although there are some main landscape elements, the multiple uses of landscape design are central for Zorlu Center: It’s the signature feature. Keeping the aspect of landscape diversity in mind and implementing it in further projects will turn out to be a formula for success and popularity. Let’s see the different aspects of Zorlu Center, where landscape design has become the most important feature. On the project site, residents, tourists, and workers can find a 100,000-square-meter designed landscape area. Zorlu Center promises a new social experience by embedding the idea of a shopping mall in a new kind of nature. The direct connection to the subway points to the strong infrastructural relation with the existing urban landscape. Being close to a high-traffic bridge and highways, the whole planting design contributes not only to the landscape of Istanbul and for recreation, but also serves as an herbal filter to the drawbacks of those roads.

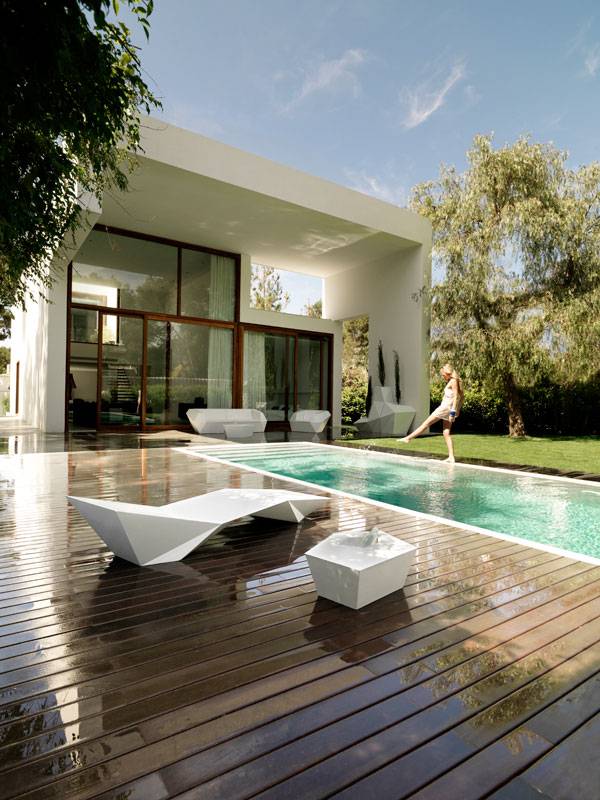
Zorlu Center. Photo credit: Cemal Emden
A New Meeting Place for the People of the City
In the middle of Zorlu Center, DS Architecture – Landscape designed a new meeting place for the city in the form of a square, where water plays a major part. The planting consists of a successful combination of shrubs, native trees, and seasonal flowers. The wooden benches invite people to take a shopping or work break and relax in the heart of the site. In the extension of the main square, the courtyard allows alternating functions and flexible uses, and is characterized by the well-known plant of Istanbul: Pinus Pinea.

Zorlu Center. Photo credit: Cemal Emden
Something for Everyone
Zorlu Center also has a multifunctional recreation area, with a swimming pool and a well-known children’ club — a playground where imagination comes to play. Furthermore, the facades of some of the buildings open into private gardens. Opened for a larger public, the Valley Park represents as a garden collection the themes of Istanbul and is a very valuable acquisition of the project.
The Shell – A Green and Tangible Utopia
Even if the landscape design is an integral part of the whole project, the most important element is the landscape roof – named “The Shell”. Beside other examples of green extensions, the utopia and imagination of vast green roofs becomes reality once again. Generally seen, landscape roofs are used for regaining lost green spaces on the ground (among other important benefits of green roofs).

Zorlu Center. Photo credit: Cemal Emden

Zorlu Center. Photo credit: Cemal Emden
Planting at Zorlu Center
The green shell surrounds the structure and associates with the hill of Istanbul, reminding visitors that this was once used as recreation areas of the city. Covered mainly just by lawn but also by shrubs (eg. Lavandula Angustifolia, Ceanothus Thysflorus), trees (eg. Ginko Biloba, Olea Europa) and perennials (eg. Acanthus Mollis, Festuca Glauca), the shell offers an excellent Bosphorus and city view. It invites its users to recreate and to contemplate the tableau of Istanbul’s strait.
Who Has Access in Zorlu Center?
Some of the elements – the square, the park, and the courtyard – point to an openness and a public sphere, inviting everyone to make use of the multiple recreation opportunities. Nevertheless, sometimes appearances are deceitful. Being a private investment, all of the outdoor spaces are not public, but are rather semi-public areas.
Not Everyone is Welcome
That means that not everyone is equally welcome on the site. This contradicts with the wish of integration in the city fabric, which is not only physically constructed but also socially created. This issue is considered as being controversial and is an unfavorable aspect of private investments such as shopping malls and bureaus.

Zorlu Center. Photo credit: Cemal Emden

Zorlu Center. Photo credit: Cemal Emden

Zorlu Center. Photo credit: Cemal Emden

Zorlu Center. Photo credit: Cemal Emden
Full Project Credits for Zorlu Center
Project: Zorlu Center Client: EAA + Tabanlıoğlu Project type: Mixeduse Project (retail, housing, office, recreational, commercial, cultural center, hotel) Investor: Zorlu Real Estate Development Architectural Project: Emre Arolat architects & Tabanlıoğlu Architects Landscape Project: DS Architecture – Landscape Landscape Architect of Record/Firm: Deniz Aslan / DS Architecture – Landscape Lead designer: Elif Çelik Design Team: Saime Selda İpek, Deniz Tümerdem, Zeynep Emektar Deniz Subaşı, Doğan Onur Araz Scope: Landscape Project + Application consultancy Project Location: Levent / Istanbul / Turkey Area: Site:12.840 m² / Construction Site: 91.868 m² Project Year: 2009 – 2013 Photography Credit: Cemal Emden Show on Google Maps
Recommended Reading
- Landscape Architecture: An Introduction by Robert Holden
- Landscape Architecture, Fifth Edition: A Manual of Environmental Planning and Design by Barry Starke
Article by Ruth Coman

Sketchy Saturday |039
This week’s Sketchy Saturday top 10. Sketchy Saturday never fails to impress us. But what particularly impressed us this week was the descriptions people wrote. They had passion in their words, which matched the passion on display in their images. Passion is the vital ingredient when it comes to success. You can study all you want, you can work for as long as you want and as hard as you want, but without a foundation of passion to guide you, you’ll never be great at what you do. You may become a well respected professional, but you will lack the passion and, therefore, the drive, dedication and commitment to stand out from the crowd. Each one of these sketches is passion manifested for the whole world to see. Enjoy this week’s Sketchy Saturday top 10! 10. by William Corbin Newton, by 4th-year landscape architecture student at the University of Georgia, USA
By William Corbin Newton
By Ben Podd
- Top 10 YouTube Tutorials for Technical Drawing
- Digital Drawing for Landscape Architecture, second edition | Book Review
- Freehand Drawing & Discovery by James Richards | Book Review
8. by Klaus Ostendorf “Over many years I did voluntary work in developing countries like Africa and India. Also, I travelled to the desert countries Egypt and Morocco. In most of these places, there are problems with a shortage of water. There are of course magnificent rivers flowing through their countries, but the problem is always to transport this water inland to their farms and villages and also into the deserts. While pondering this problem I got this idea to design a mighty bridge over these rivers. In principal, I did copy the Aqueducts of the old Romans. I had studied them before in Italy, Spain and also in Turkey. This bridge could house many terrace living quarters and also transport water in great channels on top of this bridge. This Bridge could be self-efficient with electricity through sun collectors on top of this waterway. On top of this bridge, there is a waterway and also an Autobahn designed. Also electricity- and telephone cables could have a place. Water can be transported deep into the country and into the desert. So would also this motorway and canals run deep into deserts and the country, and, therefore, would be connected with capital cities”. The drawing was in the style of a freehand perspective. I used Ink-pen, colour pencils and Photoshop”.
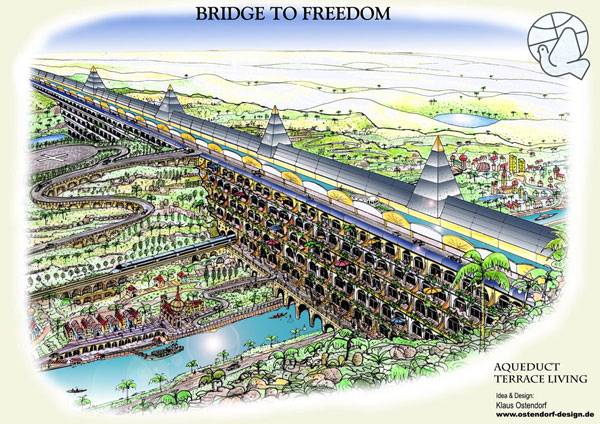
By Klaus Ostendorf
Simon Paulais
By Kamil Dadono
- Sketching from the Imagination: An Insight into Creative Drawing by 3DTotal
- Architectural Drawing Course by Mo Zell

Lowes Corporate Headquarters Cracks the Corporate Mold
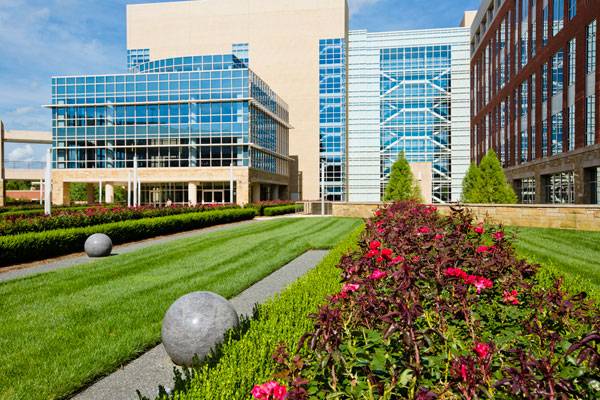
Lowes Corporate Headquarters, by HGOR and LandDesign, in Mooresville, North Carolina. Television commercials and advertisements for the Lowes home improvement centers are an everyday occurrence, but have you ever thought about what the company’s corporate offices look like? Just as their motto “never stop improving” says, they are applying that forward-thinking philosophy to the entire business, from local stores to the main headquarters. The Lowes Corporate Headquarters is located in Mooresville, North Carolina, and has proven to be an environmentally sustainable take on a corporate setting. When we think of the word “corporate”, it may induce visions of cubicles, cold parking structures, and gray surroundings, but Lowes has kicked that image to the curb in a unique way.
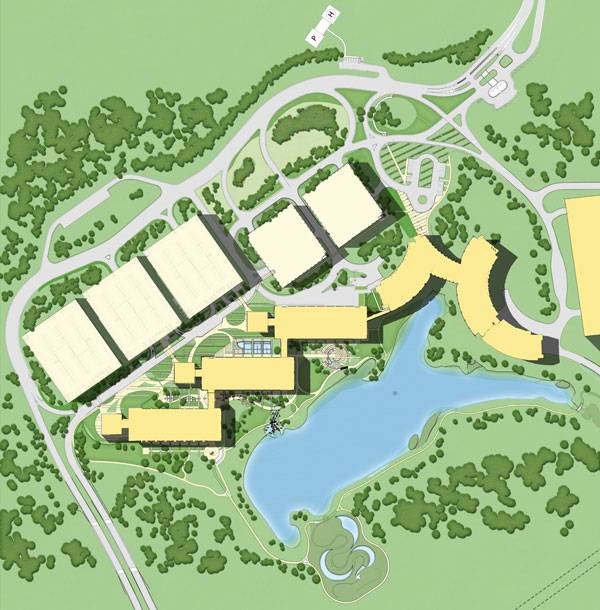
Masterplan of Lowes Corporate Headquarters. Image courtesy of HGOR
Lowes Corporate Headquarters
Trips to Lowes usually consist of purchasing materials for a do-it-yourself project, but the company’s corporate site was a lot more than a one-man job. The site was constructed in the spirit of creating an environmentally sustainable campus for the company, while still supporting the functions and needs of the 3,000-plus workers in the establishment. Passersby on Interstate 77 can see the large buildings on the site situated next to the roadway, but cannot see into the site itself — and the beautifully crafted environment that Lowes employees may enjoy. Before construction, roadways around the site were in need of improvement and better integration, so the newly worked system of roads within the site works to better offer more efficient traffic flow.
Visuals of Lowes Corporate Headquarters. Images courtesy of HGOR
More Top Articles on LAN
- 10 of the Most Common Mistakes People Make in Planting Design and How to Avoid Them
- Interested But Not Confident? – Know How to be Good at Hand Drawings
- Top 10 YouTube Tutorials for Technical Drawing
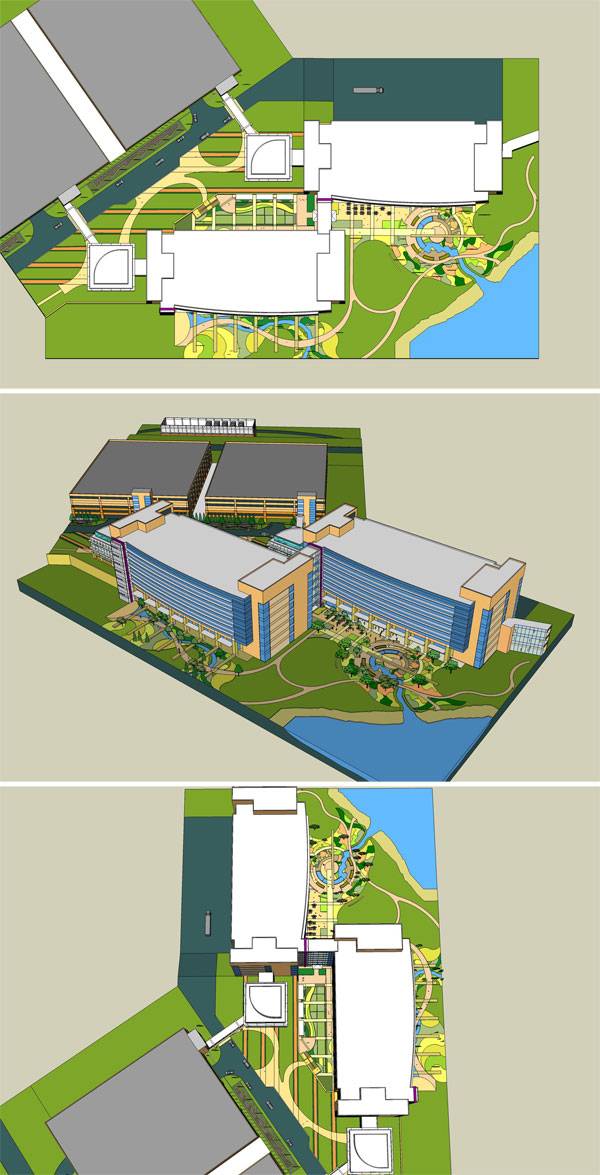
Made by Man, Loved by All The master plan for the Lowes Corporate Headquarters site revolved around a seven-acre lake that serves to support stormwater management in the form of a reservoir, as well as the creation of a space for wildlife to seek refuge. The lake was formed by the reimagining of an existing stream that ran through the site prior to construction.
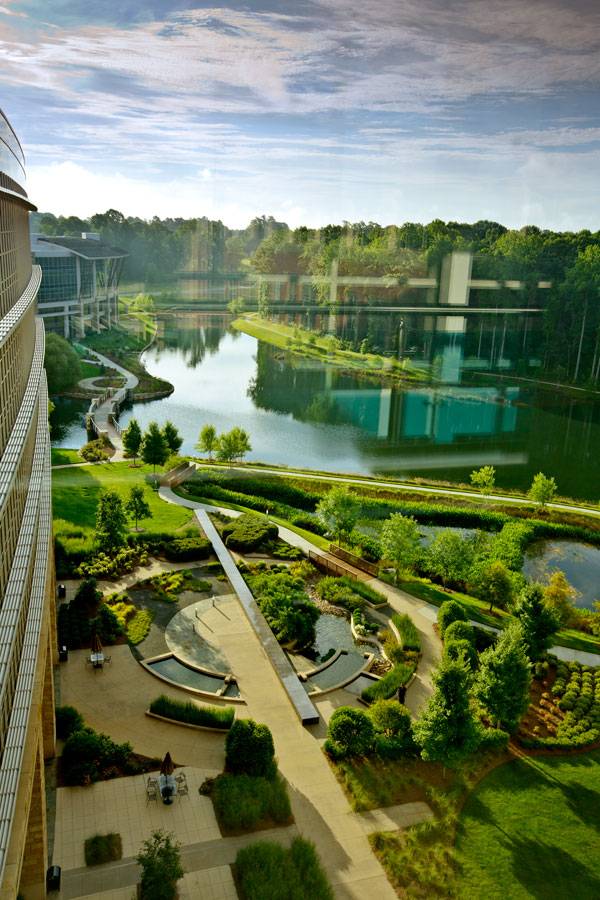
Lowes Corporate Headquarters. Image courtesy of HGOR
Lowes Corporate Headquarters. Image courtesy of HGOR
Lowes Corporate Headquarters. Image courtesy of HGOR
- Sketching from the Imagination: An Insight into Creative Drawing by 3DTotal
- Architectural Drawing Course by Mo Zell

Rocafort House Shows us That Simple is Beautiful
Rocafort House, by Ramon Esteve Studio, in Rocafort,Valencia, Spain. The Rocafort House is a residential building located in Lorquí, Murcia, in eastern Spain. The area, some 12 kilometers from Valencia, is a haven of summer homes and irrigated crops. Rocafort House was designed by Ramon Esteve Studio, a group of architects and designers working toward one goal: creating – in their words — “places where you want to live”. I once read a quote from Mies Van der Rohe that said: “Less is more”. That is very evident in this house. Ramon Esteve Studio strives for elegance without going overboard. Using clean lines, the designers make a connection between elements we might not think would mesh. But they do, and nature and structure become one without colliding into one another.
Rocafort House. Photo credit: Eduard Peris
Rocafort House
Simplicity meets perfection as the designers use nature as a construction element. Lines extend throughout the volume of the house, creating a minimalist look that feels bigger. The designers are able to do this by taking the space and detailing every inch, not missing a beat. “The concept was born from the trapezoidal shape of the plot, located in a residential area. The vegetation is a dense element of edge. That is the reason why the house is proposed like a volume where focusing views become especially important,” according to Ramon Esteve Studio.
More Top Articles on LAN
- 10 of the Most Common Mistakes People Make in Planting Design and How to Avoid Them
- Interested But Not Confident? – Know How to be Good at Hand Drawings
- Top 10 YouTube Tutorials for Technical Drawing
Rocafort House. Photo credit: Eduard Peris
Disconnecting You From Your Daily Life
Visitors to the home can contemplate light and nature from the outside through the inside. This is done by leaving the trees in front of the house and actually creating a threshold that invites you to visit the space. This threshold gives the sensation of being able to disconnect from the daily world and make a connection with nature. This house balances its structure with the natural surroundings. Without this, the project could not work properly. It is important to develop a good atmosphere within shape, form, and light. Special detailing on the walls allows light to create a different sensation in each of the rooms inside the house. This gives character to the massive volume, allowing each space to be different from the others through the use of simple details involving natural illumination. It is well thought out; every aspect of this house is very calculated, in a good way.
Mixing Architecture and Landscape
Ramon Esteve Studio knows the value of mixing elements in architecture and landscape. They have used white for the house structure, wood for the detailing on the walls so that light can filter through, green from the vegetation, and blue from the swimming pool.

Rocafort House. Ramón Esteve Estudio

Rocafort House. Photo credit: Ramón Esteve Estudio
Rocafort House. Photo credit: Eduard Peris
Finding the Balance
In observing the integration of these elements, the concept of the house becomes clearer. It is relaxing space, through the liberation from the world outside and the feeling of tranquility created using space, form, light, and nature. Connecting everything gives new meaning to living within space and nature. Finding this balance is part of the experimentation or — better yet — the exploration of creativity. Continue Reading to Page 2 >>>

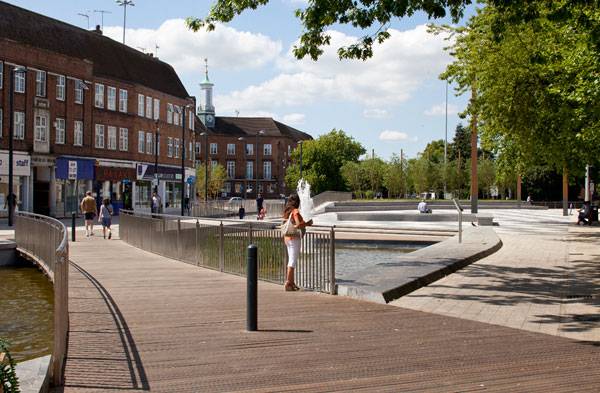
Watford Parade Rises From the Ashes to Become the Center of Attention
Watford Parade, by BDP, in Watford, Hertfordshire, England. Landscape architects are unique artists, in the sense that they take their creativity to a whole new level, using nature as their most important source of inspiration. Watford Parade is both a successful and ambitious project of landscape architecture, demonstrating that landscape design can be perceived as a form of art. The project was commissioned by the Watford Borough Council and the Hertfordshire County Council, being completed in 2014. With a construction cost of £4.3 million and a site of approximately 15000 m2, the project was successfully brought to light by the talented team from BDP.
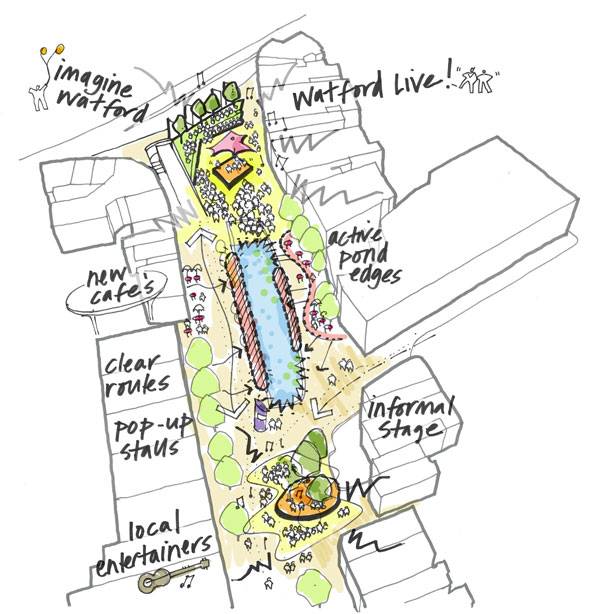
Concept plan for Watford Parade. Image credit: Martin Savage
Watford Parade
The true power of landscape architecture lies in taking an area that has lost its charm and bring it back, in a manner that is more powerful than ever. The Parade was a key element of Watford and this project managed to transform what had become a forgotten area into a key civic space. It was through the talent and hard work of the people at BDP that The Parade became a place for outdoor events, attracting visitors both during the day and night. For this project, BDP organized a complex, interdisciplinary team, with landscape architects, urban designers and numerous other specialists becoming involved. The project was part of a bigger idea, meant to rejuvenate the entire town of Watford and make it attractive all over again. The site of the project was located in the center of the town, being found at a close distance from some of the most important tourist attractions, including the Town Hall, the Colosseum Theatre or the West Herts College.
More Top Articles on LAN
- 10 of the Most Common Mistakes People Make in Planting Design and How to Avoid Them
- Interested But Not Confident? – Know How to be Good at Hand Drawings
- Top 10 YouTube Tutorials for Technical Drawing

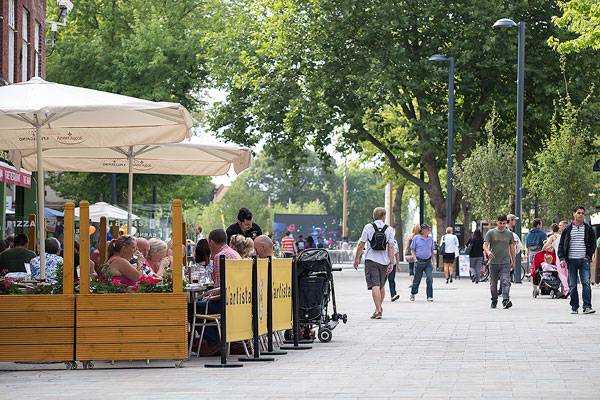
Watford Parade. Photo credit: Sanna Fisher Payne
Challenges Overcome Through Creativity and Perseverance
In deciding how the project would play out, the team at BDP considered that The Parade would have to become a link between the center of the town and the cultural quarter. However, making such a big change could not come without a set of challenges. The design team had to overcome some preconceived ideas about how the project would turn out in the end. Apart from that, there were some issues related to the movement in the area, especially since the area was going to be used by pedestrians, cyclists and vehicles at the same time.
Watford Parade. Photo credit: David Parker
Getting the Public Involved
As this was a project for the people of Watford, the creative brains from BDP got them involved in the whole proceedings. They already knew that the local residents desired the area to become more attractive. Apart from discussing the project extensively with key stakeholders, the team at BDP actually got the public involved in the design process (over 500 members). Moreover, they developed an online consultation tool – this was actually a WordPress site and it kept the public up-to-date with the works.
Watford Parade. Photo credit: Laura Ormerod
Strong Principles Make up For a Strong Project
The project was based from the start on the idea of being family friendly. Apart from that, the landscape architects at BDP (together with the rest of the team), expressed an intense desire to connect the cultural quarter with the town center. It was important that The Parade became an area that was both diverse and distinctive, attracting not only local residents but also visitors. Another principle of the project was to improve the movement of both cyclists and pedestrians in the area. It was the intention of the BDP team to create a space that could be used for different events as well, becoming a landmark for the town’s culture and heritage.
Watford Parade. Photo credit: David Parker
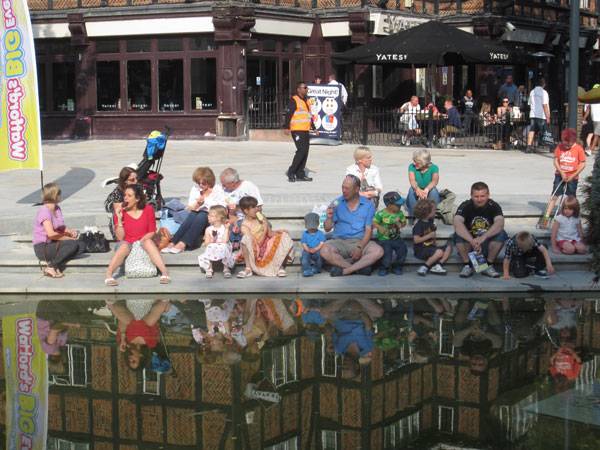
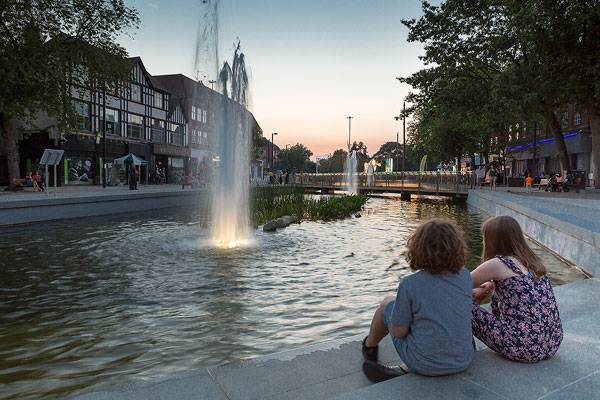
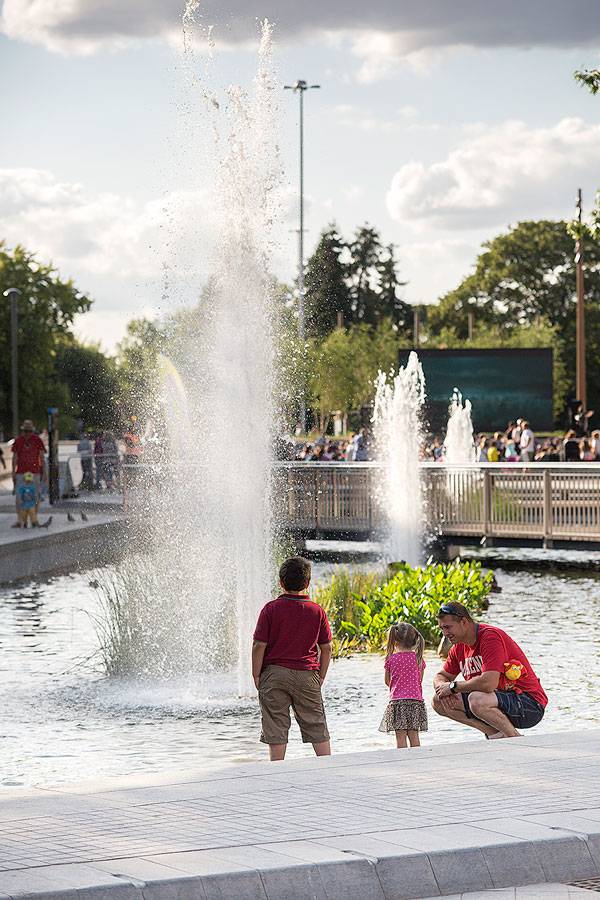
Historical Pond, Focal Point of Attention
The large historic pond had been a part of The Parade for over 100 years, being considered an element of identity by the local residents. However, at the start of the project, it was found to be in a poor condition. The quality of the water was disappointing and the filtration system was outdated. It was time for the pond to regain its status, becoming once more a focal point of attention in the center of Watford.
Watford Parade. Photo credit: David Parker
Watford Parade. Photo credit: David Parker
Watford Parade. Photo credit: David Parker
Watford Parade. Photo credit: Sanna Fisher Payne
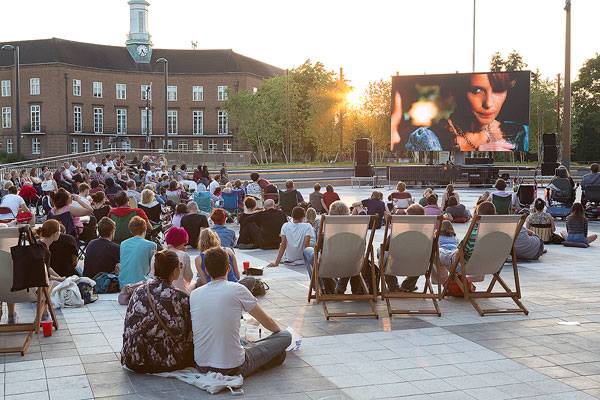
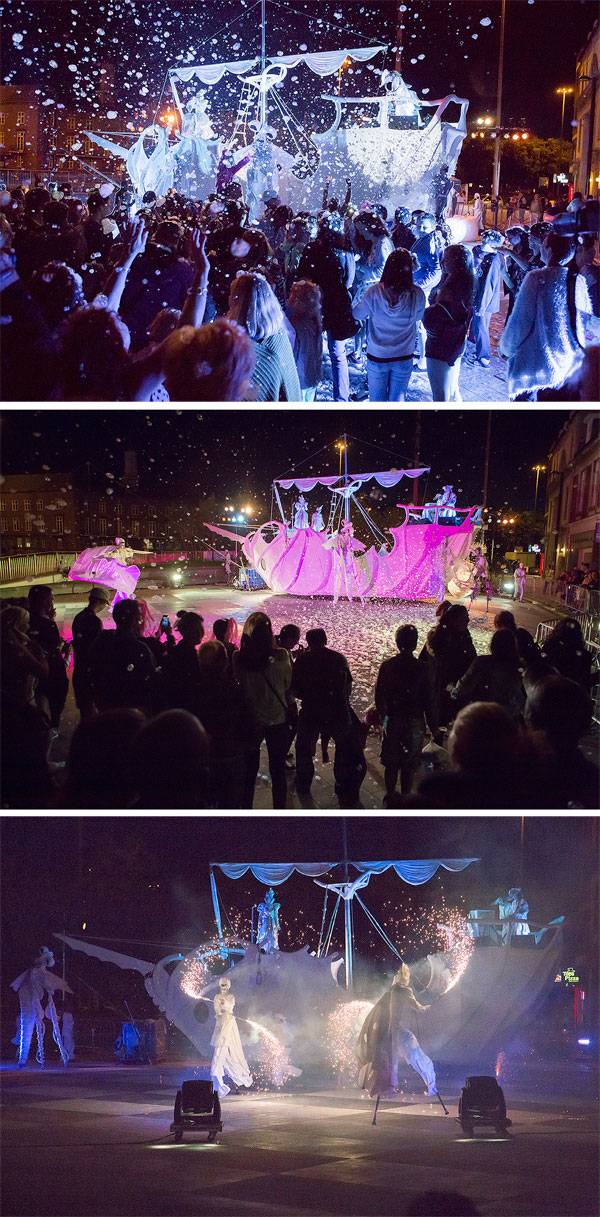
Elegant Event Space For 2000 People
The new event space is perhaps one of the most attractive elements of the park. With a capacity of over 2000 people, it is perfect for large events, having integrated power and lighting. Apart from that, it stands out with its black and white paving, not to mention the raised grass seating areas. There is also a smaller and informal event space to be discovered, being located under mature trees and on a raised timber deck. The event spaces will accommodate some exciting programs in the upcoming part of the year.
Watford Parade. Photo credit: David Parker
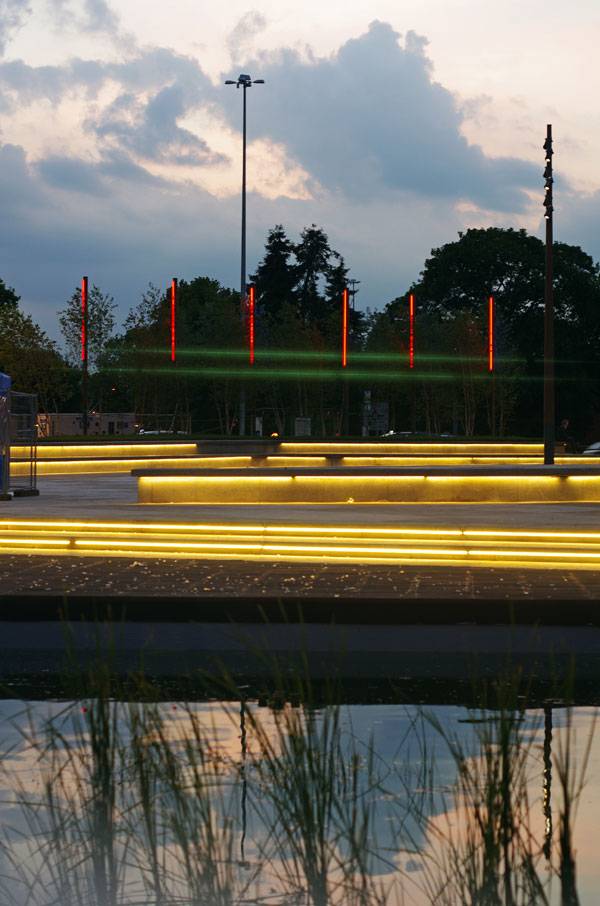
Lighting Elements of Superior Quality and Design
The street lighting was upgraded for this project, with the lighting scheme being designed in order to draw visitors in the evening or at night. The illuminated bridge crossing gives out a romantic atmosphere, while the lit fountains and the strip lighting accenting seating complete the picture. The attention of the visitors is captured by the 12 meter high feature columns, equipped with no less than 24 projectors. These projectors are meant to throw a beautiful light over the event space, making it even more attractive.
Watford Parade. Photo credit: Antoine Thevenet
Watford Parade. Photo credit: David Parker
Full Project Credits for Rocafort House
Project name: Watford Parade Location: Watford, Hertfordshire, England Landscape architects: BDP Client: Watford Borough Council and Hertfordshire County Council Construction cost: £4.3 million Completed: 2014 Show on Google Maps
Recommended Reading
- Landscape Architecture: An Introduction by Robert Holden
- Landscape Architecture, Fifth Edition: A Manual of Environmental Planning and Design by Barry Starke
Article by Alexandra Antipa
![The 10 Best Houseplants to Improve Indoor Air Quality [infographic]](https://land8.com/wp-content/uploads/2017/07/House-plants-175x175.jpg)
![The 10 Best Houseplants to Improve Indoor Air Quality [infographic]](https://land8.com/wp-content/uploads/2017/07/House-plants-80x80.jpg)
The 10 Best Houseplants to Improve Indoor Air Quality [infographic]
Your infographic guide on the 10 best houseplants to improve indoor air quality. According to studies by NASA, certain houseplants filter out harmful compounds in our homes – all linked to acute conditions and chronic disease. Based on NASA’S results, we have explored the top 10 house plants that are the most effective for removing air pollutants.
Best Houseplants to Improve Indoor Air Quality
 10 best houseplants to improve indoor air quality [Infographic] by the team at Barratt Homes. 3 More Top Articles on LAN:
- 10 of the Most Common Mistakes People Make in Planting Design and How to Avoid Them
- Interested But Not Confident? – Know How to be Good at Hand Drawings
- Top 10 YouTube Tutorials for Technical Drawing
Recommended Reading:
- The Complete Houseplant Survival Manual: Essential Know-How for Keeping (Not Killing) More Than 160 Indoor Plants by Barbara Pleasant
- The Indestructible Houseplant: 200 Beautiful, Easy-Care Plants that Everyone Can Grow by Tovah Martin
Article by Megan Criss Return to Homepage Featured image: License: CC0 Public Domain / FAQ. Image source.

Seljord and the Legends Creates New Ways to Experience Cultural Landscapes
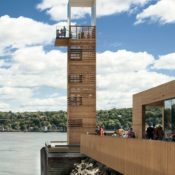
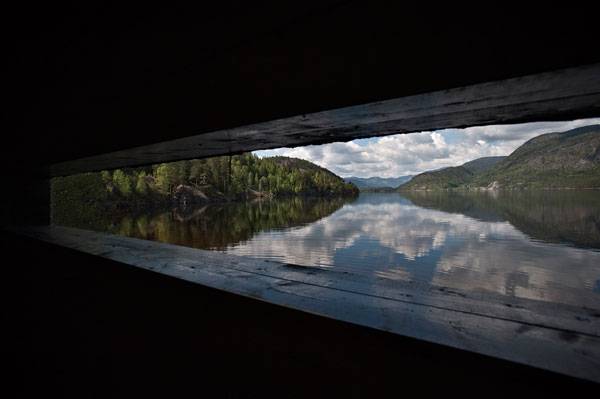
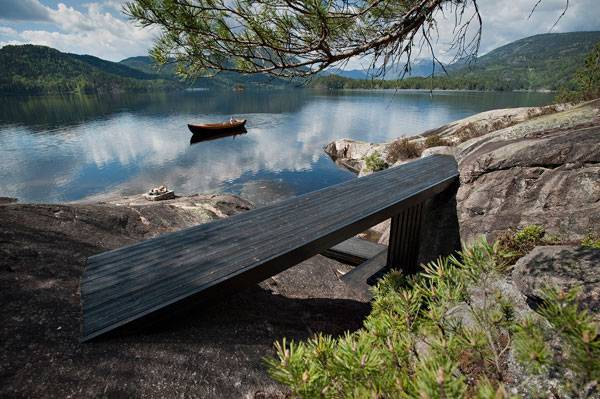
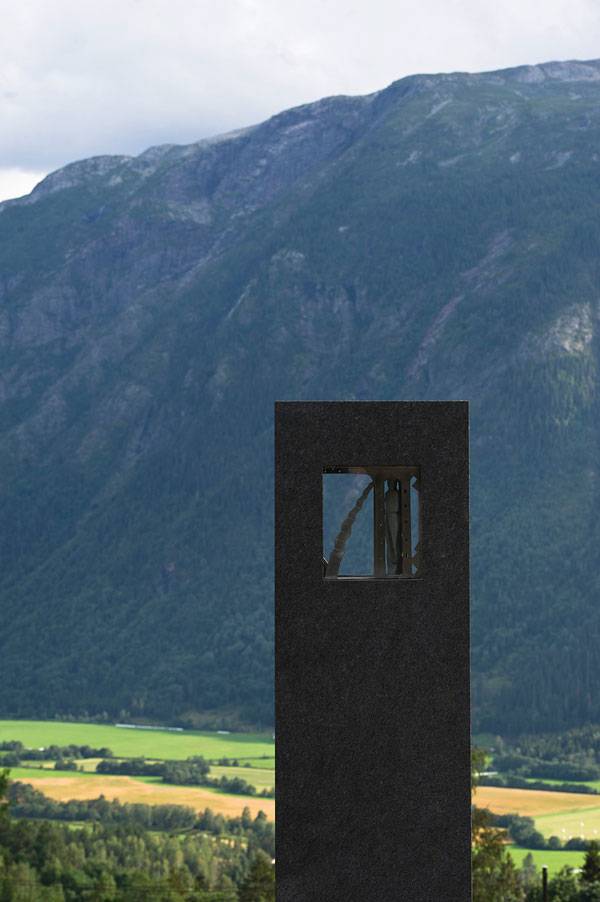
Seljord and the Legends, by Feste Landscape, Seljord, Norway. As a landscape architect, creating a space that allows others to experience the culture of a landscape can be difficult. In trying to portray a culture through design, things can get a little hokey or dull. Allowing those unfamiliar with that culture to understand and enjoy the site is also a challenge. This project, however, is seemingly effortless in its portrayal of stories into tangible creation. Feste Landscape’s thought-provoking project, Seljord and the Legends, shows how important cultural heritage is to experiencing a landscape in its entirety. The project is comprised of four art installations at different locations around Seljord Lake, close to the centre of Seljord, Norway. A walking path around the lake connects each piece, which includes “The Sauna” at Vebekkdalen, “The Fishing Point” at Telnesøyan, “The Lookout” at Grindekleiv, and “The Viewing Tower” at Bjørgeøyan. The installations work within a common framework and were designed with the intention of having visitors walk the path, coming across modern architectural pieces at natural stopping points.
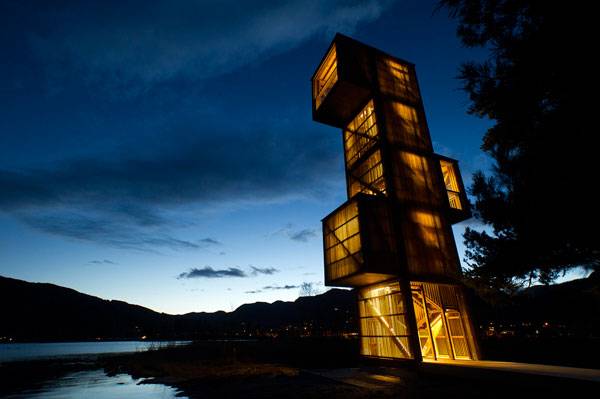
“The Lookout Tower” at Seljord and the Legends. Photo credit: Dag Jenssen
The Sauna at Seljord and the Legends. Photo credit: Dag Jenssen
Seljord and the Legends
Each piece of art — created in simple geometric shapes of wood — has created a different way to view the lake. “The Viewing Tower”, for example, is a 15-meter-high tower with several open levels, creating viewing platforms that look out over the lake and valley. Pieces such as “The Viewing Tower” are more bold and striking in their abrupt materialization — a lone tower out of the landscape — while others, such as “The Fishing Point” (a flat wooden bridge between two boulders), blend and flow with the landscape. Each is unique, but has a common purpose: Each piece of contemporary art has been placed on sites associated with local tales and legend. 3 More Top Articles on LAN:
- 10 of the Most Common Mistakes People Make in Planting Design and How to Avoid Them
- Interested But Not Confident? – Know How to be Good at Hand Drawings
- Top 10 YouTube Tutorials for Technical Drawing
“Fishing Point” at Seljord and the Legends. Photo credit: Dag Jenssen
The “Viewing Stone” at Seljord and the Legends. Photo credit: Dag Jenssen
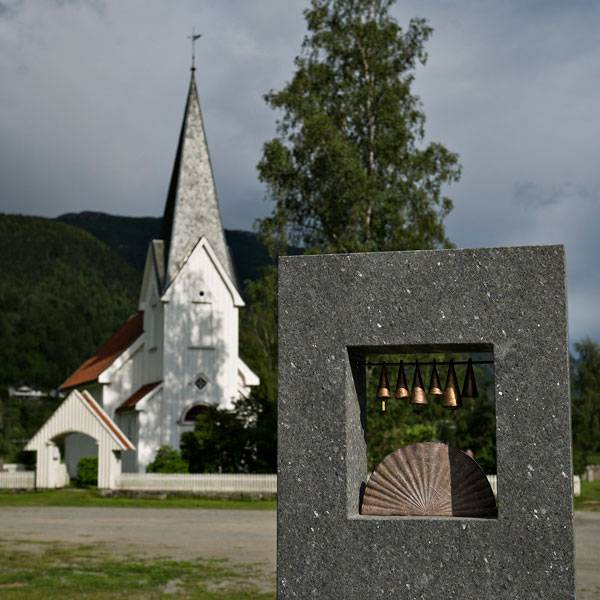
The “Viewing Stone” at Seljord and the Legends. Photo credit: Dag Jenssen

Bringing the World of Agriculture Indoors at the 2015 Expo in Milan
Harmony and Diversity at the 2015 Expo in Milan, by Teamlab, in Milan, Italy. Various mediums can influence the way we see landscape architecture, change how we think about design, and impact how we can give a supreme experience for users of the site or project. Teamlab, a collaborative group of artists based out of Tokyo, makes installations that incorporate the crafts of professions from all across the board. Their group consists of people with backgrounds in architecture, mathematics, art, engineering, animation, and graphic design, just to name a few. They have set their focus on the marriage between science and art, using public installations as the medium through which users may experience the design. 20 Million Visitors on Their Way Teamlab is set to showcase its new projects at the 2015 Expo in Milan. The Expo is hosted annually from May 1 until Oct. 31, more than 140 countries participate, and upward of 20 million visitors are expected to attend over the course of the six months. This year’s expo revolves around regional foods and each individual country’s ideas about encouraging a more sustainable future. WATCH: Discover Expo Milano 2015
3 More Top Articles on LAN:
- 10 of the Most Common Mistakes People Make in Planting Design and How to Avoid Them
- Interested But Not Confident? – Know How to be Good at Hand Drawings
- Top 10 YouTube Tutorials for Technical Drawing
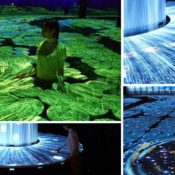
Walk Through Rice Fields, Indoors! The Teamlab group’s 2015 installations fall under the category “harmonious diversity”, and are located in the Japan Pavilion at the Expo. The installations take up two large rooms and are set up so that users must wade through them like they would if they were wading through rice fields in Japan. The installation named “harmony”, from afar, looks like a beautiful mesh of colors taking the form of the agricultural palettes of Japan. Look more closely, and you will see that the images are being projected, in harmony, onto individual screens situated atop what is symbolic of a rice stalk. The screens all sit at various heights, so users can feel the motion of the installation and how it symbolizes Japanese agriculture.

Image courtesy of TeamLAB

Image courtesy of TeamLAB

Utilize the Power of ArcGIS in Your Work to Create Informed Urban Designs
Nadia Amoroso, Director of Nadia Amoroso Studio and adjunct Professor in Practice, at University of Guelph shares with us her insights on ArcGIS Online and GeoPlanner for ArcGIS Online for Urban Design and Planning. In the past decade, planning and design professions have been enriched by a wealth of readily available site data. GIS (Global Information Systems) programs and applications provide layers of information on everything from site hydrology to population density, but urban designers, planners and landscape architects may shy away from utilizing GIS data, perceiving the applications as being too complex. GIS tasks are often passed onto a tech specialist, causing a slowdown in workflow, a lack of integration between departments and a less than perfect understanding of the data by the design team. In recent years, ESRI, a global leader in the mapping and GIS sector, has provided easy to use, design focused GIS applications that can be used by everyone working in a planning or landscape architecture company. One of these intuitive mapping and GIS applications offered by ESRI is ArcGIS Online.
ArcGIS Online
ArcGIS Online is a web-based GIS and mapping application, extending the reach of GIS to anyone in an organization. Designers and planners of all levels can easily create maps or site inventory and analysis diagrams, and then share them with anyone in the firm. Since the application is web-based, map-drawings can be viewed on mobile devices, making them easy to access in meetings or on job sites. A Software Solution ArcGIS Online can be considered as part of the Esri’s software solutions in support of the Geodesign framework. Geodesign is a term that refers to utilizing nature’s or the site’s data as part of the design process, along with the integration of GIS software to gather, evaluate, create, design, visualize and assess designs using this evidence-base support.

Gallery of date. Image courtesy of Nadia Amoroso

Base map change. Image courtesy of Nadia Amoroso

Image courtesy of Nadia Amoroso

Image courtesy of Nadia Amoroso

Analysis tab. Image courtesy of Nadia Amoroso.
Books by Nadia Amoroso:
- The Exposed City: Mapping the Urban Invisibles
- Representing Landscapes: A Visual Collection of Landscape Architectural Drawings
- Digital Landscape Architecture Now
- Representing Landscapes: Digital
Article by Nadia Amoroso, PhD, ASLA Return to Homepage


11 Things to Remember When Designing for Children
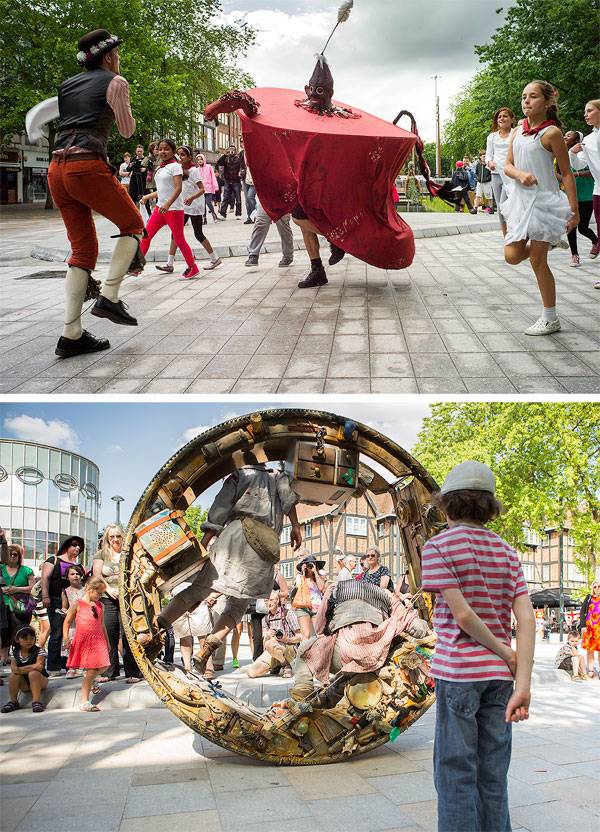
Spaces that are good for children are good for everyone, here are 11 things to remember when designing for children. Have you ever asked yourself, who is actually the greatest fan of your work as a landscape architect? Is it the one who spends long hours of playing games, enjoying the pleasure of being outside and closer to nature? Even though subconsciously, children are the ones who feel the most sincere happiness and delight when visiting a park, or an open-air playground. Children admire landscape architects’ work the most, even if they don’t really realize it. This is one of our most major responsibilities as landscape architects – how to design for children, in order to provide them with a safe, healthy and entertaining environment at the same time? In this article, we will discuss 11 crucial things to remember when designing for children. Beginning with the clarification on why children need to play outside, we will continue with the rules to follow when designing for them. Please Take a quick moment to answer our poll, so that we can provide you with the best content: [wpsqt name=”Content” type=”poll”]
Designing for Children
1. Why do children need to play outdoors? As we already mentioned, the starting point of creating a successful design for children, is to understand and then answer the question above – why do children need to play outside? Playing outside improves children’s immune systems, increases their physical activity, stimulates their imagination and creativity, and above all – makes them feel alive, as they use all their senses while playing. The list of benefits also includes developing critical thinking and problem-solving skills, as well as developing respect for nature and the other living things. Numerous research works have been conducted by psychologists to support those statements. Check out this interview on the subject of engaging children in nature with Richard Louv, a journalist and author of eight books, including The Nature Principle: Reconnecting with Life in a Virtual Age. WATCH: Engaging children in Nature: interviews with Richard Louv
2. Safety Comes First After taking into account the first step, the design process begins with fixing the place of the children’s area. A safe playground requires remoteness form busy roads, both, automobile and pedestrians, and dangerous water sources. This doesn’t necessarily mean high fences or hedge-rows. Safety always comes first, when it comes to children, but a landscape architect is also a designer. A sunken garden is a valuable example of how a space can be defined through its topography, rather than a trivial fence. Take a look at that project in Tel Aviv, displaying an unusual, yet remarkable design solution

Sunken garden view. Photography Credits Go To Eran Karu
4. Accessible Playgrounds Playground accessibility is another vital thing to remember when designing for children. Good landscape architects should provide playground equipment which welcomes all children of all abilities. Better landscape architects will go further – for they will design playground components that address physical disabilities, sensory and vision disorders, and autism. Nowadays we witness the development of healing, sensory and therapeutic gardens, which can offer a great design solution to experts interested in designing for specific groups of people and children. Here is an excellent example of a play area, designed far beyond accessibility: WATCH: Bremerton Beyond Accessible Playground
5. Careful Selection of Pavement Besides being accessible, playgrounds’ surfaces should also be safe. To let children play undisturbedly, and without fear of fall injuries, landscape architects should always consider the pavement they use for play areas. It is unacceptable to use concrete or asphalt surfaces because they don’t have any shock absorbing properties. Turf or grass is not a good option, either, as their shock absorbing qualities are minimal. Safe surfacing can be provided by shock absorbing rubber flooring, which is also easy to install, durable, and at good price. WATCH: Playground Safety
Tactile paving shouldn’t be neglected, either. It is also known as safety paving because it is used for footpaths, stairs and train station platforms to assist pedestrians who are blind or visually impaired. Pebbles or mulch are not a good choice because they can be easily lifted by children who may try to swallow them or do some other harm. 6. Shade Picking out appropriate vegetation is also of a great importance for the much-needed shadow in hot summer days. The designer has to give full consideration to the planting design in terms of the distribution of shadow from the trees. Trees should be arranged in a way which allows them to cast a shadow on the play area in the hours of strong sun. To provide shadow, tree species should be covered densely with leaves. Acer spp., Platanus x acerifolia, Liriodendron tulipifera, Fraxinus spp. form wide crowns and are suitable for that purpose. 7. Wind Isolation Trees are substantial not only for summer seasons but for the cold ones too. To design a safe playground, wind isolation should also be taken into account. This is the place where conifers can take key part. A combination of conifers with various heights can make for a better result, because it will be harder for the wind to overcome it. The variety of species will additionally form a more sustainable and ecological environment for children. 8. Water: potable and non-potable Continuing with the hardscape, it’s time to mark the water features used in or around play areas. Kids can be quite unruly and naughty while playing outside, and they often fall and hurt themselves unintentionally. Sanitary and hygiene needs are one of the reasons why drinking water fountains should be installed near play zones. As to the non-potable water features, attention should be paid if children can get into direct contact with the water from them. Although guidelines for water safety in public fountains vary from country to country and city to city, landscape architects have to follow them, regardless of the location.

Children playing in Swann Memorial Fountain, which is located in the center of Logan Square, Philadelphia, PA, USA. Photo taken with a Panasonic Lumix DMC-FZ50.. Photo credit: Ken Thomas – KenThomas.us. Image licensed under Public Domain. Image source.

You would not want this anywhere near your children. Find out more in our article featuring “Dangerous Plants“. Image credit: Water-Hemlock (Cicuta maculata). By Aaron Carlson, licensed under CC 2.0

Zorlu Center. Photo credit: Oguz Meric

A Toddlers Playground. Photo courtesy of Espace Libre
- Playground Design (Architecture in Focus) by Michelle Galindo
- The Science of Play: How to Build Playgrounds That Enhance Children’s Development by Susan G. Solomon
Article by Velislava Valcheva. Return to Homepage

The Best Way to Work With the Land at Riverside Lünen
Riverside Lünen, by WBP Landschaftsarchitekten, Lünen, Germany. Lünen is a town in North Rhine-Westphalia, Germany, along the Lippe River, which runs east to west, starting from Paderborn until it finally enters the Rhine River at Wesel. This has provided Lünen with a steeply graded green space along the Lippe, in the central part of the city. Riverside Lünen is a redesign project of that green space by WBP Landschaftsarchitekten. The five-meter height difference between the park and the river provided a challenge for connecting the two spaces. The designers did so by creating a new distinctive path that adapts very well to the natural contours, including stairs that can function as a small amphitheater facing the river. They really did a splendid job in creating an open-river park for people, using a simple touch to allow people to enjoy the beautiful surroundings and a different experience than just passing by the river in the middle of the crowded city.

Riverside Lünen. Photo credit: Claudia Dreyße, Dortmund
Riverside Lünen
Less Land to Modify Means More to Sustain Keeping it simple and sustainable, this project does not alter the natural landform. The distinctive paths and the amphitheater are built following the existing contours, adapting to the environment rather than the other way around. The landscape architects did a beautiful job of letting the environment shape the site. They designed the hardscape, which adapts really well to the existing contours and environment. Doing so both saved money and answered questions about sustainability.

Riverside Lünen. Photo credit: Claudia Dreyße, Dortmund
- 10 of the Most Common Mistakes People Make in Planting Design and How to Avoid Them
- Interested But Not Confident? – Know How to be Good at Hand Drawings
- Top 10 YouTube Tutorials for Technical Drawing

Riverside Lünen. Photo credit: Claudia Dreyße, Dortmund

Masterplan credit: WBP Landschaftsarchitekten. Riverside Lünen. Photo credit: Claudia Dreyße, Dortmund

Riverside Lünen. Photo credit: Claudia Dreyße, Dortmund

Riverside Lünen. Photo credit: Claudia Dreyße, Dortmund

Riverside Lünen. Photo credit: Claudia Dreyße, Dortmund

Riverside Lünen. Photo credit: Claudia Dreyße, Dortmund
Full Project Credits for Riverside Lünen:
Project Name: Riverside Lünen Location: 44532 Lünen, North Rhine-Westphalia, Germany Budget: 850,000 euro Designer: WBP Landschaftsarchitekten Size: 21,000 square meters Date of Construction: August 2013-February 2015 Client: Municipality of Lünen Image credits: Claudia Dreyße, Dortmund Show on Google Maps
Recommended Reading:
- Landscape Architecture: An Introduction by Robert Holden
- Landscape Architecture, Fifth Edition: A Manual of Environmental Planning and Design by Barry Starke
Article by Harkyo Hutri Baskoro


Top 10 Autodesk Revit Basics for Landscape Architects
Top 10 Autodesk Revit Basics in Easy to Follow Youtube tutorials to help get you off to the best start. Jumping into new software can often be intimidating. Autodesk Revit certainly has its challenges for landscape architects, but it is ultimately highly rewarding and can significantly increase productivity. Revit is still relatively unused, especially in small offices. However, it is slowly becoming more and more popular. It can provide much more information than an AutioCAD drawing, with the luxury of having plans, sections, and visualizations all located in one file. In the near future, we may see more of a transition from AutoCAD to Revit as the popularity of BIM increases. BIM is undoubtedly the future for landscape architecture, and Autodesk Revit is one of the leading forms of BIM that every landscape architect should understand. Unfortunately, it is not specifically tailored to landscape architecture, but design intentions can still be perfectly achieved and communicated. These Top 10 basics will make the first few Revit sessions much more manageable for any beginner.
Autodesk Revit Basics
10. Edit Type — Floors For landscape architects, the floor tool is the most common tool. We use floors to produce numerous features, such as paving and planters. It is very simple to outline a floor, but it is the information that must be added that is imperative. This can be found when selecting “edit type” under properties. Detailed floor information is added in the layer palette; this can consist of the depth of sub-base and what materials are used. Once this has all been modeled in Revit, construction details can be quickly drafted. WATCH: Advanced Revit Architecture 2012 Tutorial – Parking Garage Ramps Using Floors
9. Creating a Topography It is common for landscape architects to receive site data from a dwg file. This site data will often contain spot coordinates with Z values or Z positions. These are essentially points with elevations. These files can be imported into your Revit project and instantly developed into a 3D topography or “toposurface”. It is important that the dwg file should be competently drawn. The spot levels with Z positions should have their own specific layers, so when using Revit it makes it easier to select what layers are actually needed in order to create a toposurface. WATCH: Autodesk Revit Architecture: Creating a Toposurface
8. Understanding Families and Profiles Families are a fundamental part of Revit. The majority of elements in your Revit project are families. A profile is a 2D form that can be created and loaded into your project. These profiles are developed into 3D forms using various tools, such as sweep and extrusion (see below). Common families made from profiles include kerbs and railings. In essence, families are the components in your model (doors, benches, steps), whereas profiles are the 2D forms that create the families, via tools such as sweep. It is important to create an extensive library of profiles that can be brought into your project for future use. WATCH: Revit: How to create a Profile and Wall Sweep
7. Sweep/Create Form The sweep tool is a useful way to wrap around elements. It is important to understand that a profile is what is used to sweep your path. You can either pick an existing path or draw your own. WATCH: 02 Sweep
6. Extrusion Extrusion is relatively similar to the push/pull tool in Sketchup, yet it is often used to create a family that will be imported into your Revit project. It is important to keep an eye on your properties palette and for you to know which level you are using. WATCH: Revit Tutorials: Revit Forms – Extrusion Tool
5. Rendering WATCH: Autodesk Revit Architecture – How To Make A Render
Many students only use Photoshop to create a perspective that will often appear skewed. Revit eliminates this problem, because the visualization is created directly from your 3D model. To start, simply select the camera tool on the top of the screen. Once you have selected the location of your 3D view using the camera tool, select “render”, which is under the view tab. Lighting, site background, and the overall quality of your perspective can all be altered. It is a fast and accurate way to graphically communicate your designs. 4. Revolve The useful thing about revolve is that if you use it, you do not need to revolve your form 360 degrees. This can be edited in the properties palette. You can always go back and change the profile if needed. See these AutoCAD tutorials:
- 4 AutoCAD Commands to Draw Paving Patterns on Curving Paths
- How to Show Topography in your Plan Drawing in AutoCAD
- How to Place Large Quantities of Trees in a Master Plan Instantly with AutoCAD
WATCH: Revit Tutorials: Revit Forms – Revolve Tool
3. Swept Blend Swept blend is an ideal tool for landscape architects, as it can be used to create kerbs. The swept blend tool is really designed for a sweep that starts and finishes in different shapes. However, when creating a kerb around a sloping floor, the sweep blend is much more effective, as the path may twist and turn. Revit will function much more effectively with this command. WATCH: 04 Swept Blend
2. Visibility Graphics Categories such as floors and walls can be switched on or off. It is important to note that the visibility is only adjusted in the view you are on (such as the 3D view or site view). If you are having difficulty finding an element that is not visible, a useful tool is “reveal hidden elements” — shown as a lightbulb symbol in the view control bar at the bottom of your screen. WATCH: Autodesk Revit: Visibility and Graphics (Essential Skill)
1. Trim/Extend to Corner When building floors, it get tedious to use the modify arrow to modify your lines to the desired shape. The trim/extend tool significantly speeds up the process. It works slightly differently than the trim and extend commands in AutoCAD, but is just as effective. WATCH: Revit 2015 Trim/ Extend Multiple Elements
– Understanding the basics of Revit is a great start for any student or professional intending to improve their BIM skills. But it must be asked, should landscape architects work on a program that isn’t specifically tailored to landscape? Revit fundamentally works on flat surfaces and, although a terrain can be achieved, landscape architects may find Revit more difficult than architects who work with more flat surfaces. Ideally, Revit will develop into an even more sophisticated program than it is today, allowing landscape architects to use it just as efficiently. Recommended Reading:
- Autodesk Revit Architecture 2015: No Experience Required: Autodesk Official Press by Eric Wing
- Autodesk Revit Architecture 2014: No Experience Required Autodesk Official Press by Eric Wing
Article by Stephen O’Gorman Return to Homepage Featured image: YouTube print screen. Source.